
In today’s digital landscape, ensuring secure access to applications is more crucial than ever. With the rise of web and mobile apps, protecting user data and managing permissions has become a key concern. Two fundamental concepts that play a role in this are authentication and authorization. In this blog post, we will cover the basics of authentication and authorization, dive into popular methods like JWT (JSON Web Token) and OAuth, and provide practical insights on how to implement these in your applications.
By the end of this guide, you’ll have a solid understanding of how to secure your apps effectively and the best practices for managing user data and permissions.
1. What is Authentication?
Authentication is the process of verifying a user’s identity. It ensures that the user trying to access a system is who they claim to be. Common methods of authentication include:
- Password-based Authentication: The user provides a username and password.
- Multi-Factor Authentication (MFA): The user must verify their identity through multiple methods (e.g., a password and a one-time code).
- Token-based Authentication: The user receives a token upon successful login, which can be used for subsequent requests.
For a comprehensive guide on implementing authentication in your projects, refer to this detailed guide on authentication.
2. Understanding Authorization
While authentication verifies who the user is, authorization determines what the user is allowed to do. It is the process of checking permissions to grant or deny access to certain resources or actions within an application.
Example:
- Authentication checks if the user is logged in.
- Authorization checks if the logged-in user has permission to access a particular admin page.
JWT: JSON Web Token
JWT (JSON Web Token) is a popular way of handling user authentication and authorization in modern applications. It allows for stateless authentication, meaning the server does not need to store session information about the user.
How JWT Works:
- User Login: The user sends their credentials (e.g., email and password).
- Token Creation: If the credentials are valid, the server generates a JWT.
- Token Storage: The token is sent back to the client (browser or mobile app) and stored, typically in localStorage or a cookie.
- Token Usage: For subsequent requests, the client includes the JWT in the request headers for authentication.
JWT Structure: A JWT consists of three parts: Header, Payload, and Signature.
textCopy codeHeader.Payload.Signature
- Header: Contains information about the token type and the signing algorithm.
- Payload: Contains the data (claims) such as user information and token expiration time.
- Signature: Used to verify the authenticity of the token.
Example of a JWT:
jsonCopy code{
  "header": {
    "alg": "HS256",
    "typ": "JWT"
  },
  "payload": {
    "userId": "12345",
    "role": "admin",
    "exp": 1678901234
  },
  "signature": "hjsdf8237hnjsdkfb23823..."
}
Pros and Cons of JWT
Pros:
- Stateless: No need for server-side session storage.
- Efficient: Easy to use across different services and platforms.
- Flexible: Can be used for both authentication and authorization.
Cons:
- Security Risks: If the token is not stored securely, it can be intercepted and misused.
- Token Size: JWTs can become large, impacting network performance.
First Image Placement: An ideal spot for the first image would be here, showing a flow diagram of the JWT authentication process — from user login to token validation.
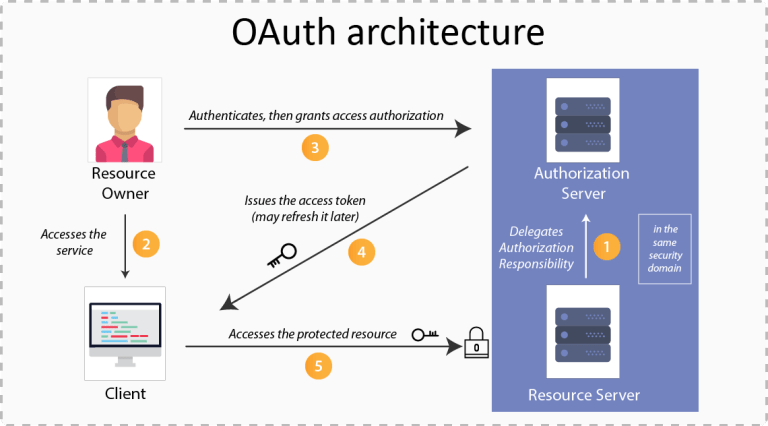
3. Introduction to OAuth
OAuth (Open Authorization) is a widely used standard for access delegation, commonly used to grant third-party services limited access to a user’s data without sharing their credentials. It is often seen when logging into websites using Google, Facebook, or GitHub.
How OAuth Works:
- User Request: The user requests to log in using a third-party service (e.g., Google).
- Authorization Grant: The user is redirected to the third-party service for authentication.
- Access Token: The third-party service sends an access token back to the client application.
- Data Access: The client application uses the access token to access the user’s data on the third-party service.
Example: When you sign into an app using your Google account, you are using OAuth.
OAuth 2.0 Flow Types
OAuth 2.0 offers multiple authorization flows depending on the use case:
- Authorization Code Flow: Used for server-side applications.
- Implicit Flow: Used for single-page applications (SPA) where tokens are exposed in the browser.
- Client Credentials Flow: Used for machine-to-machine (M2M) communication.
- Resource Owner Password Credentials Flow: Used when the user trusts the application with their credentials.
For more advanced implementations and a deeper dive into API and database management, check out this guide on how full-stack developers manage databases and APIs.
4. JWT vs. OAuth: Which One Should You Use?
Both JWT and OAuth are used in modern applications, but they serve slightly different purposes:
- JWT is best suited for stateless authentication. It’s a good choice if you need a lightweight, self-contained way of securely transmitting information between parties.
- OAuth is ideal when you need to delegate access to third-party services. It’s a better choice if your application integrates with other services (e.g., logging in with Google or Facebook).
“Security is not an option but a necessity. Understanding and implementing authentication and authorization correctly is key to building robust applications.”
5. Best Practices for Authentication and Authorization
- Use HTTPS: Always use HTTPS to encrypt data transmission.
- Implement Token Expiry: JWTs should have a short expiration time to minimize risks.
- Secure Token Storage: Store tokens securely in HTTP-only cookies or secure storage.
- Regularly Rotate Tokens: Invalidate old tokens and issue new ones periodically.
- Monitor and Log Access: Keep a log of all authentication attempts and access activities for auditing.
6. Deploying Your Application
Once you’ve implemented authentication and authorization in your application, it’s time to deploy. For a detailed guide on deploying full-stack applications, consider this Medium post on simplifying deployment with Heroku and Vercel.
Second Image Placement: This is an ideal place for the second image, showcasing a visual representation of the OAuth flow, illustrating the interaction between the user, the client application, and the authorization server.
Conclusion
Understanding the basics of authentication and authorization is crucial for any developer building modern web applications. Whether you choose JWT for its simplicity and stateless nature or OAuth for its robust access delegation, implementing these methods correctly will help you secure your application and provide a better user experience.
For a complete tutorial on setting up authentication in your projects, refer to our guide on implementing authentication, and learn more about API and database management in this comprehensive article.