
| Section 1 | Milestone benefits |
| Section 2 | Using Milestones |
| Section 3 | FAQ |
Milestones let you break complex projects into manageable steps. This keeps you organized and ensures both you and your seller stay aligned.
Welcome to Efrelance Marketplace Support Docs! Here you’ll find comprehensive guides, FAQs, and troubleshooting tips to help you navigate and make the most of our platform. Whether you’re a freelancer or a client, our documentation covers everything from account setup and project management to payment processing and dispute resolution. Explore step-by-step instructions, best practices, and detailed explanations to ensure a smooth and productive experience on Efrelance. Your success is our priority—let’s get started!
Maximize your freelance business with our “Selling on Efrelance” support documentation. Discover how to create compelling service listings, set competitive prices, manage client communications, and deliver exceptional work. Our guides offer valuable tips and strategies to help you attract clients, secure projects, and build a successful freelance career on Efrelance. Start here to elevate your selling experience!
The Top Rated badge signifies that a freelancer has been recognized for delivering the highest quality of work and service.
Earning the Top Rated status has always been a sought-after achievement. However, the path to reaching the top tier on Efrelance hasn’t always been transparent. Our revamped level system now provides greater clarity, actionable insights, and a clear view of your progress.
Discover the advantages of Efrelance’s updated level system.
How to Achieve Top Rated Status
Every Top Rated freelancer is carefully reviewed and approved by Efrelance’s evaluation team.
To be considered for this review, you must meet the following criteria:
*Tip: Track your progress on your level overview page.*
Level 2
Success score 9
Rating 4.7
Response rate 80%
Orders 30
Unique clients 15
Earnings $5,000
Next, the evaluation team will review your eligibility for Top Rated status.
We are currently focusing on high-demand categories in need of more Top Rated freelancers.
Once your review is complete, you’ll receive an email with the team’s decision.
If Approved: Your new Top Rated status will be displayed on your dashboard and your level overview page.
If Not Approved: You’ll receive an email with detailed information, including the primary reason for the decision. You will remain at Level 2, but if your metrics continue to meet the criteria after 6 months, you’ll be eligible for another review.
Our team conducts a comprehensive review based on the following four key pillars to determine your eligibility for Top Rated status. Here’s what we consider:
1. Professional Skills
2. Communication and Service
3. Professional Presence
4. Compliance with Efrelance’s Policies
For more details on what makes a Top Rated freelancer, visit our comprehensive guide.
To keep your Top Rated status on Efrelance, it’s essential to maintain the required performance metrics. If any of your metrics fall below the minimum standards, you’ll be given a 30-day grace period to make improvements. Successfully boosting your metrics within this timeframe will allow you to retain your Top Rated status. If improvements are not made, instead of an automatic downgrade, your account will undergo a review by our evaluation team to determine whether you should remain Top Rated.
In cases where the team decides on a downgrade, there is always a way to regain your Top Rated badge. After a 6-month waiting period, if your metrics meet the criteria, your status will be reviewed again, giving you a chance to reclaim your Top Rated status.
Our comprehensive review process ensures that every qualified freelancer receives the recognition they deserve. We are dedicated to carefully assessing each review to ensure the Top Rated badge is awarded to freelancers who demonstrate the highest levels of quality and service.
Currently, the evaluation team is prioritizing high-demand categories that need more Top Rated freelancers. This approach helps freelancers in these categories gain more business opportunities.
Below, you’ll find a list of these high-demand categories, estimated decision timelines, and any additional requirements. This list is regularly updated to reflect changing demands.
For freelancers whose Gigs do not fall into the listed categories, we cannot provide an estimated review timeline. However, if your skills align with one of these categories, consider creating a Gig that showcases those skills to qualify for a prioritized review.
Please Note: Simply adding a Gig to one of the prioritized categories will not automatically qualify you for an expedited review. You must have at least 30 completed orders of approved Gigs in the listed category to be eligible.
Efrelance is a dynamic marketplace where your success is recognized and rewarded through a tiered level system. This system helps you track your progress and sets benchmarks for achieving higher status, which in turn can boost your visibility and credibility among buyers. Here’s a detailed look at the levels and the criteria you need to meet to achieve them.
Achieving Level 1 status is the first milestone on Efrelance. It demonstrates your commitment and reliability as a freelancer. Here are the criteria you need to meet:
Tips to Achieve Level 1:
Reaching Level 2 status signifies that you are a seasoned freelancer on Efrelance. This level provides more visibility and trust among potential clients. To achieve Level 2, you need to meet the following criteria:
Tips to Achieve Level 2:
Becoming a Top Rated Seller is the pinnacle of success on Efrelance. This status is reserved for freelancers who consistently deliver exceptional work and demonstrate outstanding reliability. The criteria for achieving Top Rated status are:
Tips to Achieve Top Rated Status:
1. Do you have any tools that will help me run my freelance business?
2. How can I improve my professionalism and further my freelancing career?
By understanding and leveraging the level system on Efrelance, you can systematically work towards building a successful freelancing career. Each level you achieve not only enhances your credibility but also opens up more opportunities for growth and higher earnings. Start your journey today and reach new heights with Efrelance!
How to Start Selling on Efrelance Marketplace
Welcome to Efrelance, the premier marketplace for digital services. Share your expertise with our vibrant buyer community and earn money doing what you love!
Whether you specialize in graphic design, programming, content writing, translation, or voice-over artistry, Efrelance is your go-to platform. Here are some valuable tips to help you get started:
Crafting Your Seller Profile
Your profile is your introduction to the Efrelance community, so maintaining a professional image is key. Note: If you signed up using the mobile app, please complete your profile setup on a desktop for the best experience.
For more detailed guidance, check out our tutorials on Creating Your Seller Profile and Gig Image Guidelines.
Creating Your Gig
Your Gig represents the service you offer on Efrelance. This is your chance to showcase your skills and provide potential buyers with all the necessary information to choose your services.
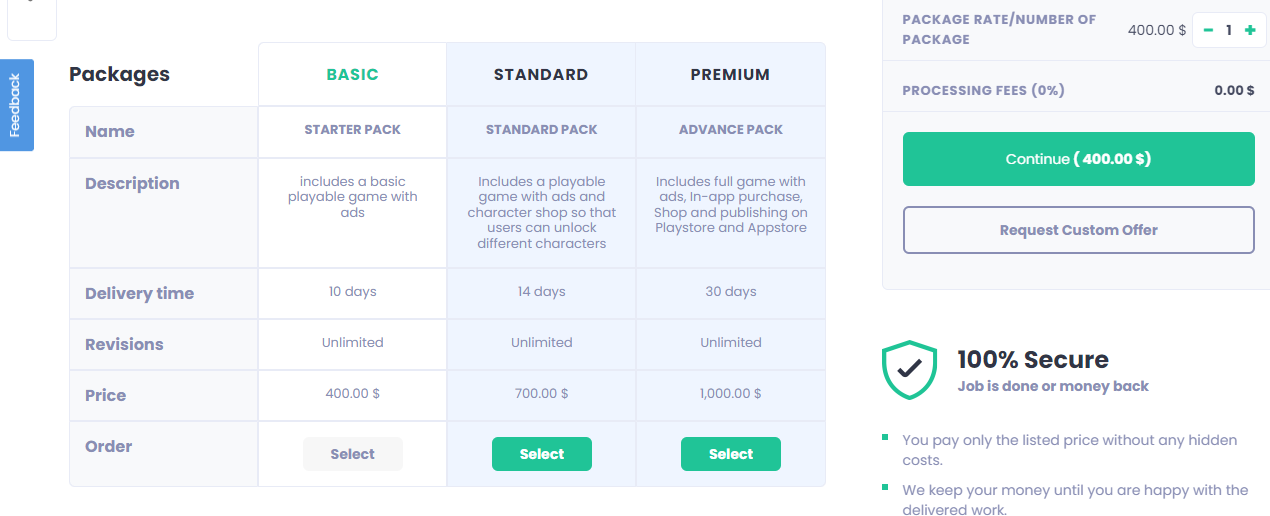
Offering Packages
With packages, you can offer three distinct service bundles on your Gig Page. This not only gives buyers more options but also helps you increase your order value!
Upselling – Maximizing Your Gig Earnings
Boost your revenue by upselling through Gig extras. You can offer these extras before, during, and after an order to enhance your earnings.
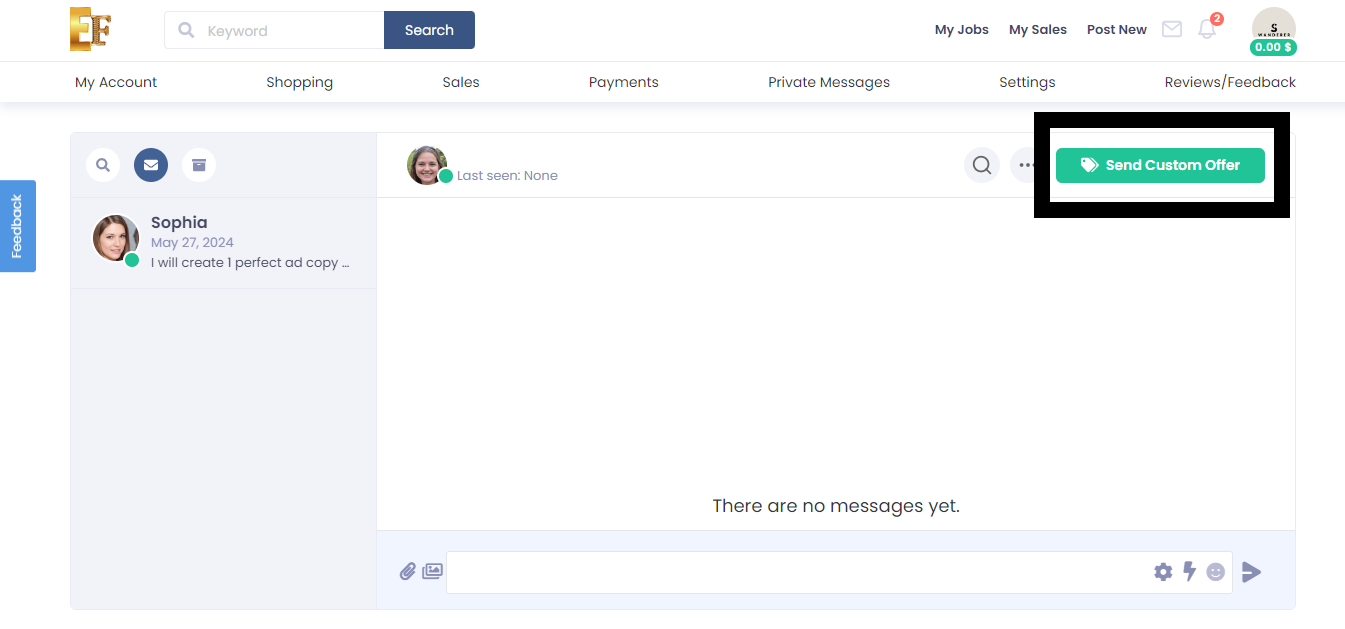
Sending Custom Offers/Responding to Buyer Requests
Take a proactive approach by sending custom offers tailored to potential buyers’ needs. This way, you can present your personalized services and secure more orders.
Join Efrelance today and start turning your skills into income!
Welcome to Efrelance, the premier marketplace for digital services. Share your expertise with our vibrant buyer community and earn money doing what you love!
Whether you specialize in graphic design, programming, content writing, translation, or voice-over artistry, Efrelance is your go-to platform. Here are some valuable tips to help you get started:
Crafting Your Seller Profile
Your profile is your introduction to the Efrelance community, so maintaining a professional image is key. Note: If you signed up using the mobile app, please complete your profile setup on a desktop for the best experience.
For more detailed guidance, check out our tutorials on Creating Your Seller Profile and Gig Image Guidelines.
Creating Your Gig
Your Gig represents the service you offer on Efrelance. This is your chance to showcase your skills and provide potential buyers with all the necessary information to choose your services.
Offering Packages
With packages, you can offer three distinct service bundles on your Gig Page. This not only gives buyers more options but also helps you increase your order value!
Upselling – Maximizing Your Gig Earnings
Boost your revenue by upselling through Gig extras. You can offer these extras before, during, and after an order to enhance your earnings.
Sending Custom Offers/Responding to Buyer Requests
Take a proactive approach by sending custom offers tailored to potential buyers’ needs. This way, you can present your personalized services and secure more orders.
Join Efrelance today and start turning your skills into income!
Response Rate and Response Time FAQs for Efrelance Marketplace
We’ve received numerous inquiries from the Efrelance community regarding response times and rates. Here, we’ve compiled answers to the most frequently asked questions.
The Response Rate Indicator serves several important purposes:
The response rate measures the percentage of first responses sent within 24 hours over the last 90 days.
Example: If you received 10 new requests in your inbox over the past 90 days and responded to 9 within 24 hours, your response rate is 90%. Note: If the 10th message is responded to after 24 hours, your response rate remains at 90%, though timely responses are always recommended.
The Response Rate Indicator tracks your first response to a new inbox message from a new buyer. Subsequent replies in the conversation are not tracked, but it’s important to continue the dialogue until it’s concluded.
Improving your response rate is achievable by responding to new messages within 24 hours. Here are some tips:
The response rate updates daily, reflecting the past 90 days.
No, automatic responses do not count as a response to the buyer’s message. They notify the buyer that you are looking into their message, but you must manually respond within 24 hours to avoid affecting your response rate. Your response time is also impacted by how long it takes to manually reply.
Working across different time zones may affect your response time, but not your response rate. You have a full 24 hours to respond to a message, regardless of time zone differences, ensuring your response rate remains unaffected.
Certain messages do not impact your response rate:
Your profile cover photo is an essential part of your presence on Efrelance. It’s one of the first things potential buyers see, and it sets the tone for your professional image. A well-crafted cover photo can help you stand out, attract more clients, and showcase your brand. In this guide, we’ll walk you through the best practices for creating an effective cover photo.
A cover photo enhances your profile by providing a visual representation of your brand and services. It’s an opportunity to make a strong first impression and communicate your professionalism. A great cover photo can:
1. Use the Correct Dimensions
The recommended size for your Efrelance cover photo is 980×180 pixels. Ensuring that your cover photo fits these dimensions will make it look professional and prevent any unwanted cropping or stretching.
2. Keep It Simple and Clean
Your cover photo should be visually appealing but not cluttered. Use a clean design that highlights key elements of your brand. Avoid overcrowding the image with too much text or too many graphics.
3. Reflect Your Services
Use visuals that are relevant to the services you offer. For example, if you are a graphic designer, you might include a snippet of your design work. If you are a writer, you might feature elements like a typewriter or a stack of books.
4. Use High-Quality Images
Ensure that the images you use are high resolution and clear. Blurry or pixelated images can make your profile look unprofessional.
5. Consistent Branding
Incorporate your brand’s colors, fonts, and logo if you have one. Consistent branding across your profile helps build recognition and trust with potential clients.
6. Include a Tagline or Key Message
If space allows, include a short, compelling tagline that encapsulates what you do. This can provide context to potential buyers at a glance.
7. Follow Efrelance Guidelines
Ensure your cover photo complies with Efrelance’s community standards. Avoid using copyrighted material unless you own the rights, and ensure your image aligns with the platform’s policies.
Once you’ve created your cover photo, follow these steps to upload it to your Efrelance profile:
1. Showcase Your Best Work
If possible, include samples of your best work or elements that represent the high quality of your services.
2. Stay Updated
Periodically update your cover photo to keep your profile fresh and reflective of any new skills, services, or branding changes.
3. Seek Feedback
Ask friends, colleagues, or fellow freelancers for feedback on your cover photo. They might provide insights you hadn’t considered.
4. Use Design Tools
Utilize graphic design tools like Canva, Adobe Spark, or Photoshop to create professional-looking cover photos easily.
Your profile cover photo on Efrelance is a powerful tool for making a lasting impression. By following these best practices and using the recommended dimensions (980×180 pixels), you can create a visually appealing and professional cover photo that enhances your profile and attracts more clients. Invest the time to craft a cover photo that truly represents your brand and showcases your professionalism.
Important: Optimize how customers see you by regularly updating your Efrelance seller profile.
Your freelancer profile is designed to highlight the person behind your professional skills. With bigger customers searching for expert freelance talent, your profile emphasizes the most important thing about your service: you.
Be sure to use our job image guidelines when adding images to your profile.
Setting Up Your Efrelance Seller Profile Note: If you don’t see the changes on your Efrelance profile immediately, don’t worry. The new features are being rolled out gradually and you’ll see them soon.
1. Add Your Profile Picture
This should take you ~3 mins
Personal Info > Profile Picture > Add Image
Establish credibility and show customers who you are with a clear and professional photo of yourself. If your profile represents an agency, you can use your company logo.
For more information, read how to make your profile stand out and always ensure that you align with our Community Standards.
2. Add a One-Liner/Tagline
This should take you ~2 mins
My Profile > Tagline
Under your profile picture, provide a precise “one-liner” about your business, professional skills, and/or experience (70 character limit).
Examples: Expert Web Designer; iOS Software Engineering; Expert in Cinematic Editing; Lead Generation Specialist.
Don’t: Mention your personal email, website, or a link to a platform external to Efrelance.
3. Add Your Education
This should take you ~2 mins
My Profile > Education > Add New
Provide your educational details.
4. Provide Your Certifications
My Profile > Certification > Add New
List your certifications.
5. “About Me”/Description
This should take you ~5 mins
My Profile > Edit Description
Share a little about yourself with your buyers—your passions, experience, skills, and whatever else has significantly shaped your professional experience.
Don’t:
6. Tag Your Most Relevant Skills
This should take you ~3 mins
My Profile > Skills > Add New
Tip: Keeping your skills up to date helps you get the jobs. Make sure to add and update your skills and routinely remove any outdated skills. Highlight your areas of specialty and expertise to help potential buyers find your service when they search the marketplace.
Don’t: Mention skills that don’t match your services.
7. Add Your Top Clients
This should take you ~5 mins
My Profile > Add A Client
Note: Currently, this feature is not available for all users. For users already accessing it, it will take a few days to reflect on your profile.
Tip: Add your most familiar customer one at a time, whose work samples you have permission to share in your portfolio.
Don’t: Mention companies’ names you haven’t worked with or use fake companies.
Build customer confidence by showing them the top brands you’ve worked for in the past. See exactly how to add your Top Clients.
8. Add Your Portfolio
This should take you ~15 mins
My Portfolio > Create Project > Upload Your First Project > Complete Details > Create New Project
Note: Currently, this feature is available for eligible sellers only.
Tip: Display your best work to represent your professional know-how, service proficiency, and unique skill set. Always highlight your best and most recent work.
Don’t: Emphasize dated works or mention your personal email, website, or add a link to a platform external to Efrelance. If your service is non-visual in nature, you can still use the portfolio to showcase your service. Example: SEO/Translation services.
Learn more about Using My Portfolio.
Job Images
This should take you about 3 mins
Use job images that stand out and describe your service the best to attract buyers and generate revenue.
When it comes to being the best on Efrelance, connecting with your customers is pivotal to your success. In this article, you will find tips for connecting with your customers, managing your orders, tracking your performance, and general tips for success, along with FAQs we often receive. Additionally, you can access the free “Be a Successful Seller” course.
Win Customers Over with Rapid Replies
Being responsive to your customers not only creates a positive experience for them but also helps build a strong and positive reputation on Efrelance. Take this a step further by providing detailed and informative updates to your customers throughout the entire process. Remember, by responding promptly, you increase your opportunity to receive future business—use Efrelance’s mobile app to respond to your messages anytime and from anywhere!
Use the Quick Response Feature
Found within your inbox and on the order page, Quick Responses—pre-written response templates—help you reply to buyers faster. You can also create your own unique responses. These are great to use when you are very busy.
To Use Quick Responses Within Your Inbox:
To Use Quick Responses Within the Order Page:
Keep Your Customers Updated During the Entire Process
When your buyer has placed the order’s requirements, provide an update once you have received everything you need to get started. It’s important to let your customers know that you are there for them throughout. Let them know of any progress updates in general. Ensure that you follow up on any questions or concerns raised by buyers to instill confidence in the process.
Create Clarity Through a Structured Work Process
From the very beginning of the order, let your customers know when they can expect to receive drafts, the final delivery, and any feedback.
Deliver Quality Work
The delivery should always fulfill (or even better, exceed!) your customers’ requirements. This means that the quality of your work should always be of a high standard. Follow up quality work with quality service and, after the delivery, ask if they are satisfied with the service they received.
Deliver On Time
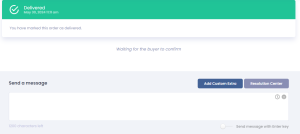
To give your customers the best experience possible, be sure to deliver on time. A timely delivery is one of the most important factors for your success as an Efrelance seller. If you find yourself running short on time, be proactive and let your customer know ahead of time, and request a delivery due-date extension using the Resolution Center. Once again, the aim is not just to meet your customers’ expectations but to exceed them in every possible way!
Once you’ve optimized your pricing and promoted your job, manage your orders and deliveries even better.
Use the Following Order Management Features:
Order Limit
If you find that you are receiving too many orders but don’t have enough time to complete them, limit the number of orders you can receive for each job. For more, see Limiting Orders.
Delivery Extension
Delivering your service on time is a critical factor in giving your customers the best experience and you being a successful Efrelance seller. However, in the event that you are unable to finish an order on time, make sure to contact your customer as soon as possible to request more time. Visit the Resolution Center to resolve the matter.
Set Your Availability
The Set Availability feature lets customers know when you are unavailable. Prior to your leave, set the time, add a quick note, and activate the feature. You will automatically become available for orders at the end of your set period.
Manage Your Orders Better: Tips
Optimize
If your job does not receive enough views or orders, consider making some changes that can help you earn more. Experiment with your packages’ pricing, the main image of your job, and the job title. Learn from the data and keep optimizing!
FAQs
How can I improve my professionalism and further my freelancing career?
Learn from Efrelance, the online, on-demand platform using video, especially tailored for freelancers and professionals. All the classes are taught by top experts who are distinguished in their fields. These courses contain practical and comprehensive knowledge, exercises, quizzes, and tests. By taking a course, you can level up your skills and grow professionally. When you successfully pass the course’s final quiz, a badge will be added to your profile showcasing the skills you have just learned.
Do you have any tools that will help me run my freelance business?
Yes. With Efrelance Workspace, you can easily send proposals, invoices, get paid, and manage your time and tasks. And best of all, it’s free to download. For more information, visit Efrelance Workspace.
Do you want to know how to grow your career as an online freelancer while offering outstanding experiences for every customer?
It’s no secret that online freelancing is empowering millions to grow their careers, take control of their schedules, and live better lives. Efrelance is leading the way for so many prolific, talented freelancers.
That’s why this course should be your number one choice when growing your business on Efrelance. Learn how Efrelance works, how to create your jobs the right way using killer descriptions, job images, convert potential customers, successfully manage and deliver projects, and more. You can live the lifestyle of a successful freelancer by turning the super tactics we’ll teach you into your success. This course is based on the experience of top Efrelance sellers, as well as a deep understanding of the marketplace and all of the tools that are available for you on the platform.
Manage your Efrelance account with ease using our comprehensive support documentation. Learn how to set up, secure, and optimize your account, update personal information, configure notification settings, and more. Our guides provide step-by-step instructions to ensure you get the most out of your Efrelance experience, helping you stay organized and efficient. Start here to take full control of your freelance journey!
Let’s review everything you need to know about the different account types, how to create a buyer account, and how to activate your seller account.
Before diving into the steps for creating or activating your account, it’s important to understand that all accounts created on Efrelance are buyer accounts by default.
Buyer vs. Seller Account:
Buyers can purchase services (Jobs) from sellers on the Efrelance platform.
Sellers can offer their services through Jobs to buyers on the Efrelance platform.
The distinction between a buyer account and a seller account only arises when a buyer decides to start offering services as a seller.
Note:
Before you can create and sell Jobs on Efrelance, you need to activate a “seller” account.
Activating your seller account and creating Jobs can only be done on a desktop.
All sellers are reviewed during the sign-up and Job creation process and are subject to approval by Efrelance.
Learn more with our Terms of Service.
Efrelance allows you to create a buyer account, a seller account, or a combined buyer and seller account. Additionally, you can have a separate Efrelance Pro account, which helps you organize all your freelance work in one place with enhanced capabilities, at no extra cost.
Note:
Efrelance Pro accounts are for buying only and cannot be converted to seller accounts.
You may only have one seller account on Efrelance.
Learn more about how to create a Efrelance Pro (buyer only) account with Efrelance Pro: Creating your account.
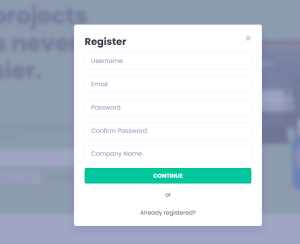
Go to Efrelance’s homepage and click Register.
Fill in your details. Enter your email address, username and password, then click Continue.
Note: You can choose to add company name or not
Get your profile started:
Choose a username. Note: Once created, your username cannot be changed. However, your display name can be edited. Check out our article on How to change your display name.
Confirm your email: Enter the verification code sent to your email.
Your account has now been created.
Once your buyer account is successfully created and activated, you can activate your seller account.
Before activating your seller account, ensure the email on your Efrelance account is correct. If not, change your email or contact Support for assistance.
Activate Your Seller Account:
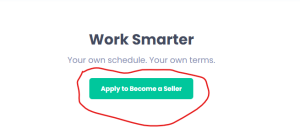
Log in to your Efrelance account. Once you login, click on Apply to Become A Seller
2. On the redirected page, click Apply to Become a Seller again to start the onboarding process. And then wait for admin to approve your account
Learn more tips and tricks for creating Gigs with Creating a Gig.
By default, all accounts on Efrelance are created as buyer accounts. To create and sell Jobs, you need to activate a seller account.
All sellers are reviewed during the sign-up and Job creation process and are subject to approval by Efrelance. For more details, refer to our Terms of Service.
Steps to Activate Your Seller Account:
Log in to your Efrelance account.
Click on your profile picture.
Select “Apply to Become a Seller” at the top menu.
Start the Onboarding Process:
On the redirected page, click “Apply to Become a Seller” again.
You’ll be directed back to the homepage where you will wait till admin approves your account.
Learn more about creating jobs on Efrelance platform
Navigate cancellations and refunds smoothly with our comprehensive support documentation. Learn about our policies, understand when cancellations are appropriate, and find out how refunds are processed. Whether you’re a freelancer or a client, our guides provide clear steps for initiating and handling cancellations and refunds, ensuring transparency and fairness for all parties involved. Get acquainted with our procedures to ensure a positive experience on Efrelance.
Note: The default payment method at the time of purchase will be charged, which may not be the original payment method used.
Note: Subscriptions are available only in certain subcategories and to select sellers.
You can work with a seller for up to a 6-month period. Under “Choose your plan,” select the subscription period that suits your needs. For more flexibility, you can ask your seller to create a custom offer on a daily, weekly, or monthly basis.
Sellers can offer discounts on future orders when you subscribe to their Gig. The discount, visible in the “Choose your plan” section, applies from the second order onwards.
With subscriptions, the same order is automatically billed from your saved payment method based on the chosen time period. You can edit your Gig requirements, and sellers can charge extra for additional requirements on the order page.
Note: Each order is independent, and the next one will begin regardless of the previous one’s status unless the subscription is canceled.
You can cancel upcoming subscription orders before the order start date. If an order has already started, regular cancellation terms apply. You can rate your seller’s services after each order’s completion.
Canceling Your Subscription
Subscriptions allow you to offer your services on an ongoing basis, work long-term with your favorite buyers, and attract new ones.
If eligible, you can offer subscriptions with your custom orders and add them to your Gigs.

Cancel Your Subscription
Was this article helpful?
| Section 1 | Milestone benefits |
| Section 2 | Using Milestones |
| Section 3 | FAQ |
Milestones let you break complex projects into manageable steps. This keeps you organized and ensures both you and your seller stay aligned.
Transparency
Managed Expectations
Communication
Custom Offers: Milestones
Gigs: Milestones

Note: You have 8 days from the delivery of each milestone to request a revision or accept it. If you don’t, the order will stop and be marked as completed.
After accepting the delivery and completing the order, you have 10 days to start the next milestone.
FAQ
When should I use milestones?
Use milestones for bigger projects to allow for more flexibility in smaller steps. Milestones reduce risk and incentivize sellers to maintain high standards with per-task payments.
What are some examples of milestone projects?
Example 1:

When will I be charged?
You’ll be charged for the first milestone when you place an order. Subsequent payments are made upon your approval of each milestone.
How can I cancel a milestones order?
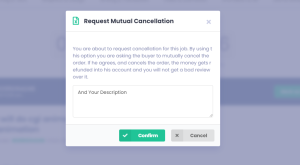
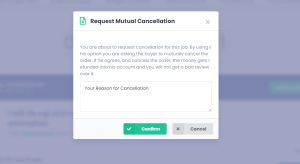
Cancel a milestone or the entire order through the Resolution Center or Customer Support for valid reasons.
I don’t see milestones as an option on my seller’s Gig page. What do I do?
Contact the seller and ask them to send you a custom offer using milestones.
How do revisions work with milestones?
You have 8 days from the delivery of each milestone to request a revision or accept it. If not, the order will stop and be marked as completed.
What is the maximum number of milestones allowed in an order?
A maximum of 5 milestones per Gig order and 6 milestones per custom offer. For ongoing services, consider using Subscriptions instead.
Can I use milestone and subscriptions at the same time?
No, you can choose either subscription or milestones, but they can’t be combined in the same order.
Need more help?
Contact the Customer Success Team! We’re here to guide your project to success. Reach out at @efrelancehelpcenter.com to get started!
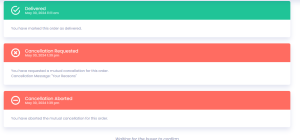
Important: Cancellations should always be a last resort. They can negatively impact both the buyer experience and the seller’s time and potential income. Here’s an overview of the different types of cancellations:
Note: If issues persist, contact Customer Support for assistance.
Learn more with Resolution Center for Buyers or Resolution Center for Sellers.
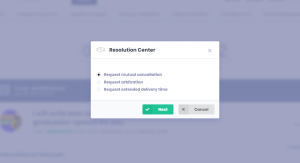
The Resolution Center is a great resource for resolving issues quickly and easily between customers and freelancers without needing to contact Customer Support.
Note: The Resolution Center is unavailable for completed and canceled orders.
Get an Order Update
Ask Your Freelancer to Cancel an Order
Note: Disputes submitted through the Resolution Center are sent to the other party and can be viewed on the Order page. They are not sent to Customer Support, nor are they notified of the dispute.
Open Disputes
You won’t be able to open a new dispute if your dispute is in the process of resolving one of these issues:
Forced Cancellation
Note: Only the seller can send the delivery extension request. Buyers may ask their sellers to do so via the order and inbox messages.
Disclaimer: In certain cases, order cancellations may not affect your order completion rate. Learn more with All about Order Completion.
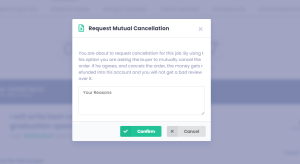
Note: Customers have up to 48 hours to accept or decline your dispute request.
Remember: You can view and/or withdraw your open disputes, request to extend the delivery date, and add Extras/Custom Offers all on the Order page.
Learn more with Cancellations and Helpful Tips on How to Avoid Cancellations.
If you still need further assistance, please contact Customer Support.
Ratings and reviews are essential for promoting a trustworthy experience within the Efrelance marketplace. We aim to maintain a reliable review system that benefits both buyers and freelancers. This guide provides comprehensive information on reviews and ratings, including how to provide feedback, the visibility of reviews, and important considerations.
The public review section allows buyers to rate completed orders, leave written reviews, share work samples, and, in some cases, provide feedback on canceled orders.
Buyers’ ratings, written reviews, and shared work samples are displayed on both the freelancer’s profile (under reviews) and the Gig page (within the Live Portfolio).
Tip: We encourage honest reviews to help others make informed decisions. Please keep reviews respectful and to the point.
How to Add a Review:

Rating Topics:
New Feature: Share your review and showcase the delivered work simultaneously.


Why can’t I add a review to my order?
My order is still active. Can I add a review?
Can I change my review after editing it?
How can I remove the delivered work from showing with my review?
Explore the powerful tools and features available to sellers on Efrelance with our dedicated support documentation. Learn how to showcase your skills, attract clients, and manage projects effectively. From creating compelling service listings to utilizing communication tools and invoicing options, our guides empower you to maximize your earning potential and deliver exceptional results. Dive into our resources to unlock the full potential of your freelance business on Efrelance.
In the competitive world of freelancing, establishing trust and credibility is paramount. One powerful way to achieve this is by generating social proof for your work on Efrelance. Social proof refers to the positive influence created when people see others engaging with your services or products. Here’s how you can leverage social proof to increase trust and credibility with clients on Efrelance:
By implementing these strategies to generate social proof for your work on Efrelance, you can establish yourself as a trusted and reputable freelancer, attracting more clients and opportunities for success.
Are you looking to give your job listing the spotlight it deserves? Look no further! Efrelance offers an exclusive “Feature Job” option that puts your project directly in front of thousands of talented freelancers.
Ensure your job stands out from the crowd by appearing prominently on Efrelance’s job listings. With increased visibility, you’ll attract more qualified freelancers to bid on your project.
Catch the eye of seasoned professionals and expert freelancers who actively seek out featured jobs. By highlighting your project, you signal to freelancers that you’re serious about finding the best talent.
With more freelancers viewing and bidding on your job, you’ll expedite the hiring process. Choose from a pool of highly skilled candidates who are eager to take on your project.
A featured job garners more attention, creating healthy competition among freelancers vying for the opportunity to work with you. This competition often leads to better proposals and more competitive pricing.
Showcase your commitment to quality by featuring your job. Freelancers are more likely to trust and engage with projects that have been highlighted, knowing they’re backed by serious clients.
Feature your job today and experience the benefits of increased visibility, access to top talent, and a streamlined hiring process. With Efrelance’s “Feature Job” option, finding the perfect freelancer for your project has never been easier.
| Feature | Free | Starter | Business | Professional |
|---|---|---|---|---|
| Job Packages | Available | Available | Available | Available |
| Tips | Available | Available | Available | Available |
| Number of Extras Allowed | 3 | 5 | 10 | 20 |
| Number of Extra Fast Deliveries Allowed | 3 | 5 | 10 | 20 |
| Number of Additional Revisions Allowed | 3 | 5 | 10 | 20 |
| Number of Multiple Jobs Allowed | 3 | 5 | 10 | 20 |
| Number of Active Jobs Allowed | 30 | 50 | 100 | 200 |
| Number of Multiple Extras Allowed | 3 | 5 | 10 | 20 |
| Number of Multiple Videos Allowed | 3 | 5 | 10 | 20 |
| Minimum Price for Job Allowed | $5.00 | $5.00 | $5.00 | $5.00 |
| Maximum Price for Job Allowed | $1,000.00 | $1,000.00 | $1,000.00 | $1,000.00 |
| Minimum Price for Extra Allowed | $5.00 | $5.00 | $5.00 | $5.00 |
| Maximum Price for Extra Allowed | $1,000.00 | $1,000.00 | $1,000.00 | $1,000.00 |
| Minimum Price for Custom Extra Allowed | $5.00 | $5.00 | $5.00 | $5.00 |
| Maximum Price for Custom Extra Allowed | $1,000.00 | $1,000.00 | $1,000.00 | $1,000.00 |
| Profile Label | Subscription Level 0 | Subscription Level 1 | Subscription Level 2 | Subscription Level 3 |
Discover exciting freelance opportunities and streamline your job search with our comprehensive support documentation. Learn how to navigate our platform to find relevant projects, submit compelling proposals, and secure rewarding gigs. Whether you’re a seasoned freelancer or just starting out, our guides offer valuable insights and tips to help you succeed in landing your next job on Efrelance. Start exploring to find your next professional challenge!
Your live portfolio is a crucial feature that allows potential buyers to see examples of your past work. Buyers love seeing real examples before placing an order, so it’s highly recommended to maintain an active live portfolio for all your jobs on Efrelance. This guide will help you understand how to manage your live portfolio effectively.
The live portfolio feature is enabled by default, allowing buyers to display or remove your work samples once a job is delivered. Here’s how to manage your live portfolio:


An active live portfolio on Efrelance is a powerful tool to attract more buyers and increase your orders. By showcasing your past work, you build trust and credibility with potential buyers. Follow the steps outlined above to manage your live portfolio effectively, and ensure it always reflects the best of your abilities. For further assistance or more tips on managing your portfolio, feel free to reach out to our support team. Happy freelancing!
Your job listing allows you to showcase your talents to potential buyers on Efrelance. It’s crucial to provide all relevant information needed before a buyer places an order. Occasionally, you may need to update or edit elements of your job listing to keep it fresh and accurate. This guide will walk you through how to effectively edit your jobs.

Regularly updating and editing your job listings on Efrelance ensures that they remain accurate, appealing, and competitive. By following these steps, you can easily make changes to your job information, media, and extras, keeping your services attractive to potential buyers. For further assistance or more tips on managing your jobs, feel free to reach out to our support team. Happy freelancing!
Efrelance provides a fantastic platform to showcase your freelance services, but to maximize your reach and attract more clients, promoting your jobs on social media is essential. Different social media platforms offer unique ways to connect with potential clients. Here’s how you can effectively promote your jobs on various social media channels.
Why Facebook? Facebook is one of the largest social media platforms, offering vast opportunities to reach a diverse audience.
How to Promote on Facebook:
Why Twitter? Twitter is great for sharing quick updates and engaging in real-time conversations with a wide audience.
How to Promote on Twitter:
Why LinkedIn? LinkedIn is a professional networking platform, ideal for connecting with potential clients and showcasing your professional achievements.
How to Promote on LinkedIn:
Why Instagram? Instagram is perfect for visually showcasing your work and connecting with a younger, creative audience.
How to Promote on Instagram:
Why Pinterest? Pinterest is a visual discovery platform, excellent for showcasing portfolios and attracting clients looking for creative services.
How to Promote on Pinterest:
Why TikTok? TikTok is rapidly growing, offering a platform to share short, engaging videos that can go viral.
How to Promote on TikTok:
Why YouTube? YouTube is the go-to platform for video content, perfect for sharing detailed tutorials and showcasing your expertise.
How to Promote on YouTube:
By effectively utilizing these social media platforms, you can significantly boost the visibility of your jobs on Efrelance. Remember to:
Promoting your jobs on social media can greatly enhance your freelance career on Efrelance, helping you attract more clients and grow your business. Start leveraging these platforms today and watch your freelance success soar!
You can share your profile, which includes your jobs, customer reviews, and details.
To share your profile:
To share your job:
By following these steps, you can easily share your profile and job listings with potential clients.
Your portfolio is a powerful tool to attract and impress potential clients. Set yourself apart by showcasing your best work, professional expertise, service proficiency, and unique skills. When clients see the quality of work you can deliver, it builds a new level of trust, which is crucial for upselling your services.
If your service is non-visual, you can still use the portfolio to showcase your work. For services without creative samples, simply describe your work and list your relevant skills in any category (e.g., Writing & Translation, Admin Support, Web Development).
Add a Project to Your Portfolio
You can upload between 2-20 projects to demonstrate the range of your skillset.
To add a project:
How to Maximize Your Portfolio
Note: Ensure you have personally created every item in your portfolio and that you adhere to the marketplace’s Terms of Service.
Let’s explore how to make the most of your portfolio by including various project types, highlighting your skills, and using high-quality images.
Project Types
Use your portfolio to showcase complex projects you’ve delivered. These projects might be difficult to communicate through the job gallery or description alone.
We recommend that the portfolio projects you display should:
Expertise
Choose projects that accurately reflect your best skills and validate your professional specialty, as advertised in your job listings.
Images
First impressions are crucial in business, and visuals can convey powerful messages. When prospective clients view your portfolio, they make decisions quickly. Visually appealing portfolios are more likely to attract clicks and deeper engagement with your service offerings.
Organize Your Portfolio
Be strategic about the projects you display and their order. This varies by service category, but some common best practices across all categories include:
Quality Over Quantity
Emphasis on Up-to-Date Skills
Permission
Tell Your Project’s Story
Your portfolio allows potential clients to see the work you’ve already done. Clients appreciate seeing examples before placing an order, so maintain an active portfolio for all your services.
Use your portfolio to tell your project’s story by focusing on:
Skill Diversity
Dynamic Storytelling
By following these guidelines, you can create a compelling portfolio that highlights your skills, attracts potential clients, and ultimately helps you succeed in the freelance marketplace.
Expanding your presence on various platforms can help you reach a broader audience and grow your profile on Efrelance.
To scout platforms and increase your profile:
Promote Your Efrelance Profile:
By scouting and utilizing multiple platforms, you can significantly increase your visibility, attract more clients, and grow your profile on Efrelance.

It’s essential for clients to see a sample of your work to gauge your professionalism and better understand the services you offer. Add a video to your job listing and use this opportunity to personally and creatively explain your service. Ensure you use a high-quality and original video that stands out.
Disclaimer: Only use images and content created or fully owned by you. Do not use copyrighted materials, or your job listing may be removed from the marketplace.
Job Video Requirements
Video & Animation Subcategories Requiring a Job Video:
Other Categories: While not mandatory, we recommend uploading a job video with audio. Your video can influence customers and motivate them to purchase your services.
Job Video Guidelines: Dos and Don’ts Follow our guidelines to ensure your job videos are high-quality and compliant with our policies. Recommendation: Mention that your services are offered exclusively on Fiverr.
Dos:
Don’ts:
Add a Job Video and Thumbnail
To add a job video to a new job listing:
Note: To adjust your video’s thumbnail, the video must be approved first.
To edit your job video’s thumbnail:
Job extras provide an excellent opportunity to expand your service offering and increase your income on Efrelance. They allow you to showcase additional services that may not be included in your job packages, providing added value to potential buyers. Here’s how you can maximize your earnings with job extras:

 In the world of freelancing, your job image is often the first impression buyers have of your service. Making a great first impression is key to attracting potential buyers and boosting sales. To help you succeed on Efrelance, we’ve created comprehensive job image guidelines. Let’s dive into how you can make the most out of your job images:
Before updating your job images, review our Gig image requirements and recommendations. Ensure your job image is appealing, high-quality, and complies with Efrelance’s Terms of Service and Community Standards. A great first impression is crucial in capturing the attention of potential buyers.
If you include text overlay on your job image, keep it concise and visually easy to read. Less is more; use up to 10 words total, and avoid repeating your title. Clear and concise text overlay enhances the visual appeal of your job image.
While the use of third-party logos is permitted, avoid overcrowding your job images with too many logos. Keep your images clean and simple to maintain visual appeal. Remember to respect image usage rights and adhere to Efrelance’s guidelines.
If you choose to upload a picture of yourself, ensure it’s high-quality, well-lit, and in focus. Your image should align with Efrelance’s Community Standards and contribute to a genuine and visually appealing representation of yourself.
Utilize “before and after” images or mockups to showcase your skills and inspire potential buyers. Your sample gallery allows up to three images to display your best work effectively. Avoid overwhelming collages and focus on highlighting your expertise.
If you use stock images or graphics, ensure you have the rights to use them and that they’re high-quality and relevant to your job. Efrelance recommends clean and visually pleasing images, especially in design categories where original work is required.
When combining text, graphics, and photos, ensure your main object remains the focal point. Avoid overwhelming visuals that may confuse potential buyers. The final graphic should capture your audience’s attention effectively.
Utilize examples provided to spark inspiration for your job images. Reviewing examples can help you understand how to upload compelling job images and ignite your creativity.
Remember, a great job image can lead to more sales and revenue. Your online representation influences buyers’ excitement about your service. Use job images that stand out to attract buyers and generate more revenue.
If you need additional assistance to improve and update your job images, our dedicated support team is here to help.
By following these guidelines, you can effectively showcase your services and make a lasting impression on potential buyers. Happy freelancing!
Implementing standardized job packages is a crucial step in enhancing the catalog on Efrelance and fostering business growth for freelancers. By adhering to standardized packages within specific categories, freelancers can ensure consistency and clarity in their service offerings, leading to a better user experience for buyers. Here’s a comprehensive guide on standardizing your job packages:


By standardizing your job packages, you contribute to a more streamlined and consistent user experience on Efrelance while positioning yourself for business growth and success.
For further assistance or guidance, feel free to reach out to our support team. Happy freelancing!
Master the art of order management on Efrelance with our comprehensive support documentation. Learn how to effectively track, organize, and fulfill your orders to ensure timely delivery and client satisfaction. From managing project milestones to handling revisions and resolving disputes, our guides provide step-by-step instructions and best practices to streamline your workflow and enhance your freelance experience. Dive into our resources to optimize your order management process and elevate your success on Efrelance.
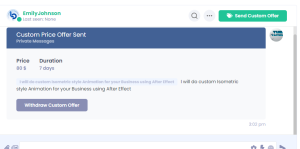

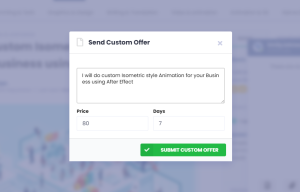
Custom offers are all about being proactive—offer your customized services to potential buyers.
Note: Milestone and subscription custom offers are not available in all categories.
Note: This feature is being introduced and is not yet available to all Efrelance users.
Subscription Benefits:
Subscription Details:
Learn more about Subscriptions.
Milestones Benefits:
Milestone Details:
Learn more about Milestones.
Choose either subscription or milestones; they cannot be combined into the same order. Suggest a payment option based on the buyer’s information:
In all cases:
Learn more about custom offers by reading our blog: Custom Offers Can Help Your Efrelance Business Grow.
Learn more with The Perfect Proposal.
Was this article helpful?
.
Structured Gig requirements stand out as one of the most valuable tools for freelancers. The more detailed, straightforward, and organized these requirements are, the smoother your work process will be, leading to better results.
Setting Expectations:
Avoiding Misunderstandings:
Time Saving:
Creating an Organized Work Process:
Enhancing Customer Experience:
Structured Gig requirements not only streamline your workflow but also contribute to a positive buying experience, ultimately leading to increased customer satisfaction.
Delivering a Gig often brings a sense of accomplishment and satisfaction, knowing that you’ve completed a task and are about to be compensated. However, sometimes the hand-off process doesn’t go as smoothly as anticipated, particularly when a buyer does not accept their delivery.
Regardless of the reason, there are occasions when a buyer’s expectations may not align with the delivered work, leading to requests for significant revisions. In such situations, there are several solutions available, including the Resolution Center, designed to help you resolve issues with the buyer before involving Customer Support.
Here’s a step-by-step guide to navigate this process:
It’s normal for buyers to request revisions, even if you’ve put considerable effort into your delivery. Remember, a revision request doesn’t necessarily reflect negatively on your work’s quality. Stay composed, and focus on maintaining professionalism while communicating clearly with the buyer.
Take time to carefully read and understand the buyer’s feedback and revision requests. If necessary, seek clarification from the buyer to ensure you grasp their expectations accurately.
If the requested revisions fall outside the original Gig scope, politely explain this to the buyer. Break down the effort required for the requested changes and suggest revisions that align with the scope while addressing the buyer’s needs.
If you’re capable of making the requested revisions and understand the buyer’s expectations, proceed with revising the work. Use the “REDELIVER NOW” option to submit the modified work via the order page.
While maintaining high ratings is important, avoid pressuring the buyer regarding ratings, especially when addressing dissatisfaction or confusion. Focus on resolving the issue in a professional manner.
If issues persist and cannot be resolved through direct communication, consider using the Resolution Center as a last resort. Here, you can seek assistance in resolving disputes or issues with the order.
If necessary, canceling an order through the Resolution Center may be considered. However, note that certain cancelations may not impact your seller completion rate. Familiarize yourself with the implications of order cancelations through resources like “All about Order Completion.”
For additional guidance and tips on effective communication and order management, consider exploring resources such as Communication Webinars or helpful tips on avoiding cancellations.
Once your Gig has been approved, you are officially eligible to start receiving orders! You can expect to receive a notification for each new order made by a buyer. Depending on your preferences in your account settings, you will receive a push notification and/or an email every time you receive an order.
Note: You can view recent inbox conversations with the buyer from within the order page.
If you find yourself very busy or are unable to handle a large number of orders received, you have the option to set a limit on the number of orders you can receive. This will allow you to manage orders while continuing to provide your buyers with exceptional service.
To limit the number of orders in your queue:
Notes: By using this feature, you can control the number of orders you can receive. Once the limit you set is reached, your Gig will temporarily be removed from Efrelance’s search, meaning that buyers will not see your gig when they look for the service.
If you choose to disable this feature, your Gig will return to Efrelance search (approximately 15 minutes later).
Using this feature does not affect your ranking or ratings.
This feature does not prevent buyers from placing orders in previous custom offers.
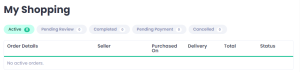
As a seller, you can manage your orders based on different tabs on your Manage orders page.
Learn more about the different types of order statuses with What does my order status mean?.
3. Click on an order within the list to view the order details.
Note: The red clock showing the time when the delivery should be made is a helpful tool for sellers to track the time spent on an order. This is not an indicator of the status of the order.
| Tab | Explanation |
| Priority | All the orders that require additional actions from you (e.g. rejected orders, late orders, etc.). |
| New | All the orders that are new orders you’ve received from buyers. |
| Active | All the orders that you’re currently working on, and are In progress.If an order was placed, but the information required from the buyer wasn’t submitted, then you will see that your order is Awaiting requirements. |
| Late | All the orders that have yet to be delivered. An order is considered to be Late if it has not been delivered for 24 hours after the delivery date. |
| Cancelled | All the orders that have been cancelled. |
| Starred | These are the orders that you’ve chosen to highlight as important. |
Revisions allow buyers the ability to reject a seller’s delivery and provide sellers with more time to include buyer feedback and any changes required—based on the delivered work.
Revisions are an optionalfeature that sellers may choose to offer their buyers.
Note: When sellers offer revisions on their Gig, they should be prepared to support the buyers’ requests.
When a buyer requests revisions on an order, the order’s status is updated to Rejected.
This means that the buyer rejected the delivery, and the seller is now required to update the delivery to include the changes requested.
Note: This doesn’t mean that the seller is refusing to work on the revisions requested.
Learn more with What does my order status mean?
| Tips for buyers | Tips for sellers |
| 1. Communicate the changes you require as clearly as possible. | 1. Communicate clearly about the exact amount of revisions you offer your buyers per Gig. |
| 2. To make sure the order status changes, click on the Yes/No buttons and answer the questions (even if they don’t 100% apply to your request).Note: If the order remains Delivered, then your revision request was not recorded correctly. | 2. When your service offers a revision, always respect the buyer’s request.Note: You must communicate the exact amount of revisions you offer as clearly as possible. |
| 3. Keep in mind that revisions must be requested within 3 days of the delivery or the order will be automatically marked as Completed. | 3. If you choose to set unlimited revisions, it’s your responsibility to revise the Gig until the buyer is satisfied. |
To better understand how to provide revisions check out Revisions done right
| Note: The source file extra is available in specific categories only. |
When you create your Gig, you can offer source files as an extra. If a buyer purchases a source file Gig extra, you need to upload the source files when you deliver your order. If a buyer didn’t select the source file extra, you still have the option to upload source files when you deliver, and it will be offered for sale. We recommend that you upload the source files in every delivery.
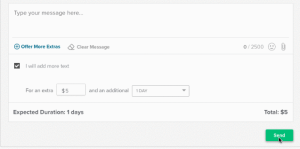
When you receive an order, you can offer extra services to the buyer within the active order. For example, if you provide logo designs and a buyer ordered your basic service, you can write the buyer a message and offer extra services, such as a higher resolution file, additional revisions, or custom-made stationery.
Notes:
The buyer will be notified and may choose to accept the offer and pay, decline the offer, or ask for changes. You can also withdraw the offer. You will be notified every time the status of the order has changed.
Navigate the process of hiring freelancers on Efrelance effortlessly with our user-friendly support documentation. Learn how to find the perfect talent for your project, evaluate proposals, and securely manage payments. From posting job listings to communicating with freelancers and managing project milestones, our guides offer valuable insights and tips to ensure a seamless experience. Get started today to find the right freelancer for your needs and bring your projects to life on Efrelance.
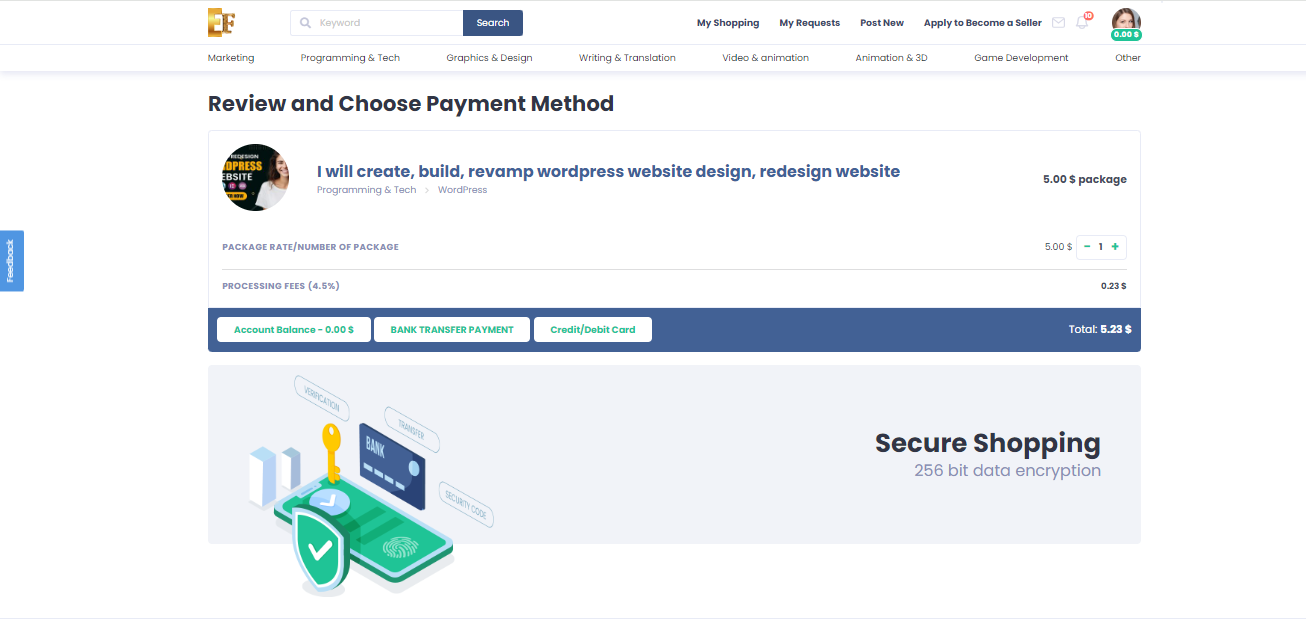
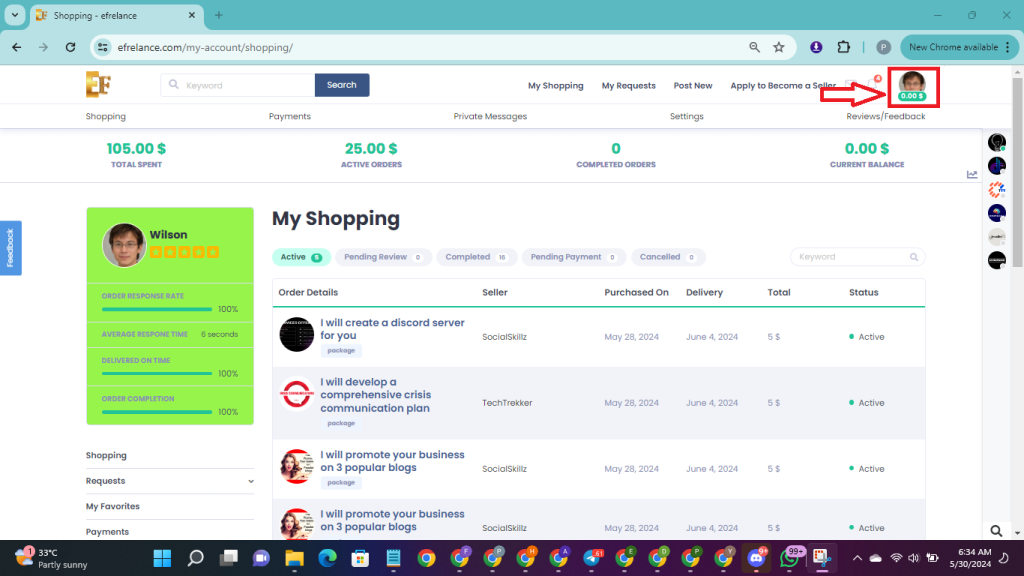
Here’s a guide on how to purchase an order with bank transfer on Efrelance after selecting a gig and completing other necessary steps:
By following these steps, you can successfully purchase an order with bank transfer on Efrelance after selecting a gig and completing other necessary steps.
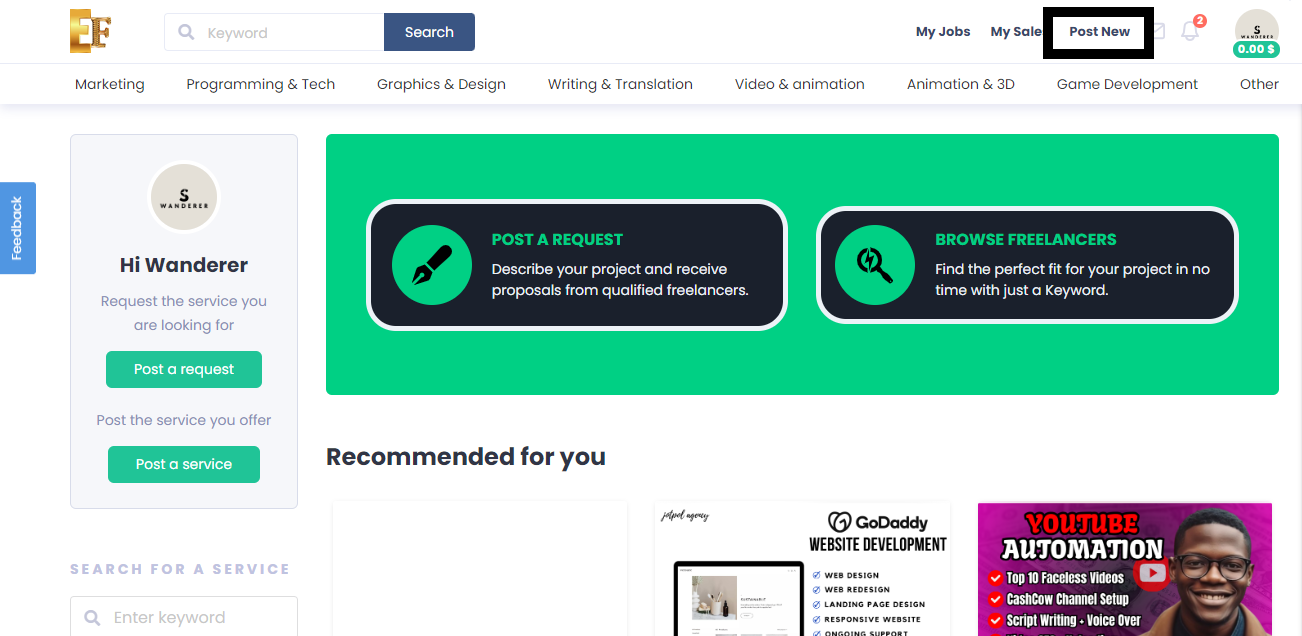
To create a request and allow freelancers to find you as a buyer on Efrelance.com, follow these steps:
Log in to Your Account:
Visit Efrelance.com and log in to your account using your credentials.
Access the Requests Section:
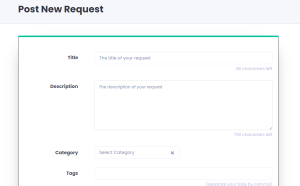
Once logged in, click on “Post A Request”.
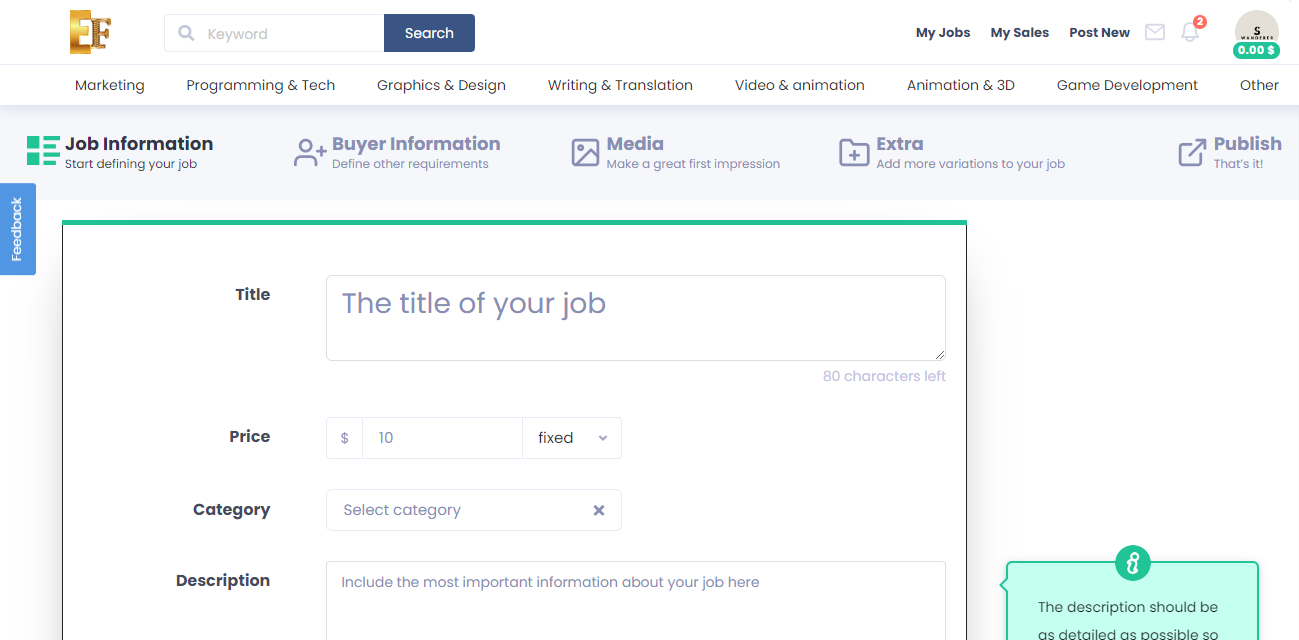
Provide Details:
Fill out the form with as much detail as possible about the service or project you need. Include information such as:
Title of the request: A clear and descriptive title that summarizes your project.
Description: Provide a detailed description of the project requirements, including any specific tasks, deliverables, deadlines, and expectations.
Category and subcategory: Select the relevant category and subcategory that best fits your project.
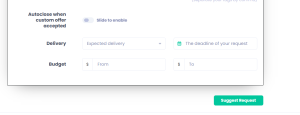
Budget: Indicate your budget for the project. This can be a fixed price or a price range.
Timeline: Specify the expected start date and deadline for the project.
Additional requirements: Any other specific requirements or preferences you have for the project.
Review and Submit:
Review the information you’ve provided to ensure accuracy and completeness. Once you’re satisfied, submit the request.
Wait for Responses:
After submitting your request, it will be visible to freelancers on the platform who specialize in the relevant category. Freelancers who are interested and qualified to work on your project may submit proposals or bids in response to your request.
Evaluate Proposals:
Once you start receiving proposals from freelancers, take the time to review each one carefully. Evaluate the proposals based on factors such as experience, expertise, portfolio, and proposed budget.
Communicate with Freelancers:
Engage with freelancers who have submitted proposals by asking questions, seeking clarifications, and discussing project details further. This will help you assess their suitability for the job.
Award the Project:
After evaluating the proposals and communicating with freelancers, select the freelancer you believe is the best fit for your project. You can then award the project to them, either directly through the platform or by contacting them outside the platform to finalize the details.
Collaborate and Manage the Project:
Once the project is awarded, work closely with the freelancer to collaborate on the project and ensure it progresses smoothly. Use the platform’s communication tools and project management features to track progress, provide feedback, and manage milestones.
By following these steps, you can create a request on Efrelance.com and allow freelancers to find you as a buyer, enabling you to connect with skilled professionals who can help bring your projects to life.
How does the referral program work on Efrelance?
With Efrelance’s referral program, you and your friends can earn rewards. Here’s how it works: When you refer a friend to Efrelance, they will receive a 5% discount on their first purchase. In addition, you will earn a 5% credit of the amount of their first purchase.
To participate in the referral program:
Log in to your Efrelance account.
Then use this link to access the Referral page “https://efrelance.com/referral-url-generator/”
You will be directed to the referral page where you will need to paste a link of the related service your referral wants to buy
Now Search for the service your referral wants to buy. and copy the link above it
After copying the link, then paste it inside the box in Efreelance URL Generator
Then click on ‘Generate’ and Copy the link and send it to your referral
Please note: You will receive a notification and an email once the reward is granted. It may take up to two days for the reward to be processed and credited to your account. Remember, the 5% discount applies only to the first purchase made.
Ensure that your friends sign up using your referral link. The referral won’t work if your friend already has an Efrelance account or if they sign up without using the link.
Please note: All orders must be legitimate. Any attempt to manipulate or exploit the referral program may result in an account suspension.
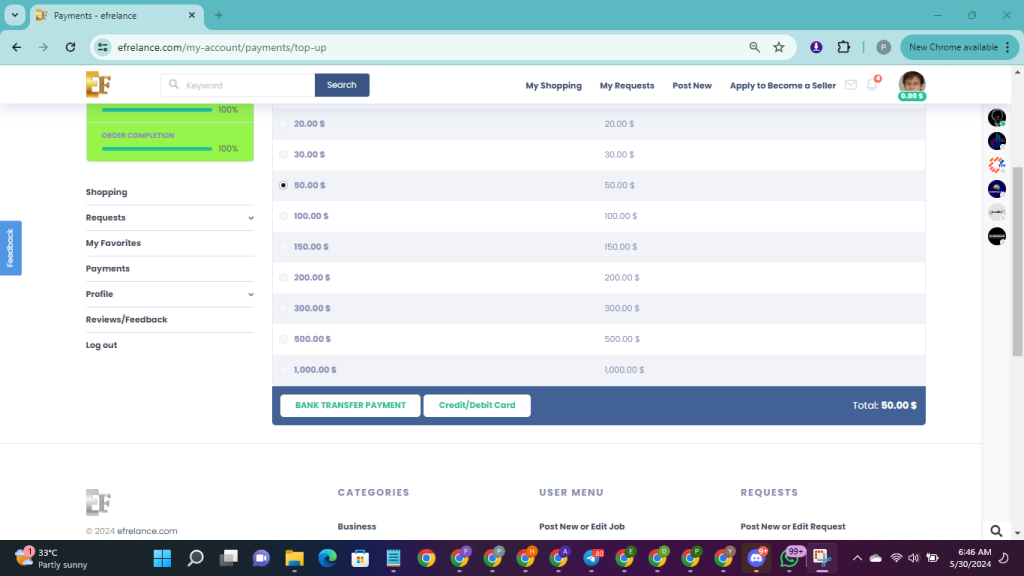
To top up your account credit using bank transfer on Efrelance, follow these steps:
By following these steps, you can easily top up your account credit using bank transfer on Efrelance and continue to use the platform’s services for your projects and transactions.
Here’s a guide on how to increase your account credit as a buyer on the Efrelance platform:
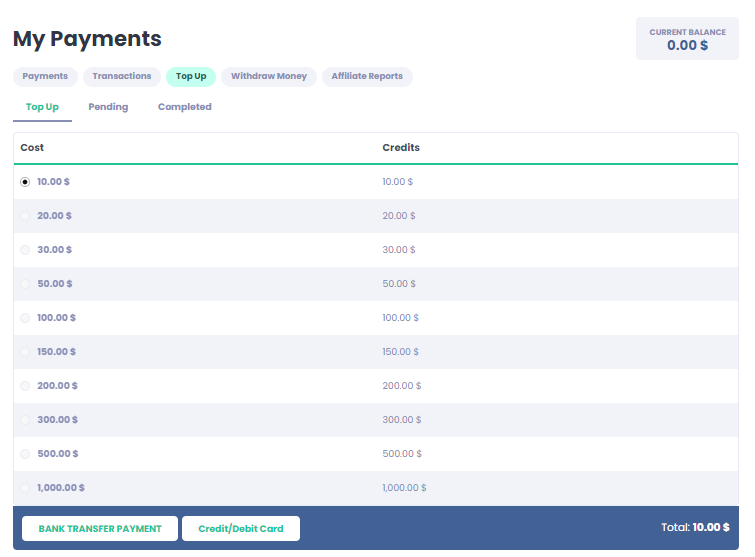
By following these steps, you can effectively increase your account credit as a buyer on the Efrelance platform and enhance your purchasing power for various services and projects.
Manage your finances on Efrelance confidently with our comprehensive support documentation on payments and withdrawals. Learn how to securely process payments for services rendered, set up payment methods, and withdraw your earnings seamlessly. Whether you’re a freelancer awaiting payouts or a client making payments, our guides provide clear instructions and insights to ensure smooth transactions. Dive into our resources to optimize your financial management and make the most of your Efrelance experience.
When buyers place orders, they pay Efrelance. Once the order is completed, the funds are credited to your account. The funds remain under a “pending” status clearing period depending on your seller level. This timeline ensures financial processing and buyer satisfaction. Once the funds are marked “cleared,” they become available for withdrawal.
Note: This does not apply to Logo Maker orders. To learn more about Logo Maker earnings and withdrawals, please refer to our article on Efrelance’s Logo Maker earnings tier model.
Processing Time:
Availability:
Method Change:
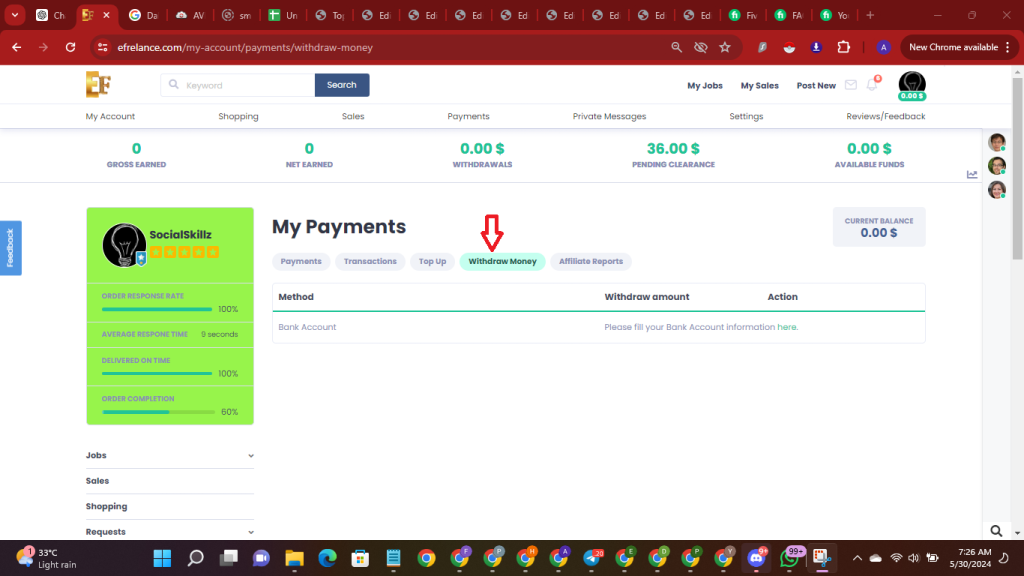
You will only see the option to withdraw if you have money available in your balance.
Note: Certain options are only available to some sellers and/or locations.
Currency conversion fees apply and additional charges may be added by your bank or payment provider.
Note: Users in Malaysia cannot withdraw in their local currency due to local regulations.
If you currently receive funds in USD and would like to receive funds in EUR, GBP, AUD, CAD, or ILS, you’ll need to register again instead of connecting your payout method.
The Withdraw Balance button can be accessed on the Earnings page. In the Available Funds section, you will see the amount available for you to withdraw and the Withdraw Balance button.
When I set to use my local currency, my revenues don’t update. Why?
What can I do if my withdrawals are failing?
Note: Withdrawals are final and can’t be undone. We will not be able to refund or change this process once it has begun.
My withdrawal was refunded… where are my funds?
Efrelance offers various payment methods to accommodate users from different regions and devices. The available payment methods depend on your device, country of residence, and regulatory permissions. Below is a list of the payment methods you can use:
Note: Cryptocurrency is not accepted as a payment method.
If you have funds in your Efrelance Balance, they will be automatically applied to your next purchase. For purchases exceeding your balance, additional payment sources (such as credit cards, debit card or bank transfer) can be used to cover the difference. On the checkout page, you will see:
For team accounts, only one payment source can be used if the purchase exceeds the balance.
For further assistance, see Payment issues.
For withdrawing your earnings from Efrelance, we currently only accept bank transfers. All withdrawals are processed in USD currency only. Other withdrawal methods such as PayPal are not supported.
All transactions on Efrelance, whether for purchases or withdrawals, are conducted in USD only.
Topping up your Efrelance balance is a straightforward process. Follow these steps to ensure you have sufficient funds for your next purchase.
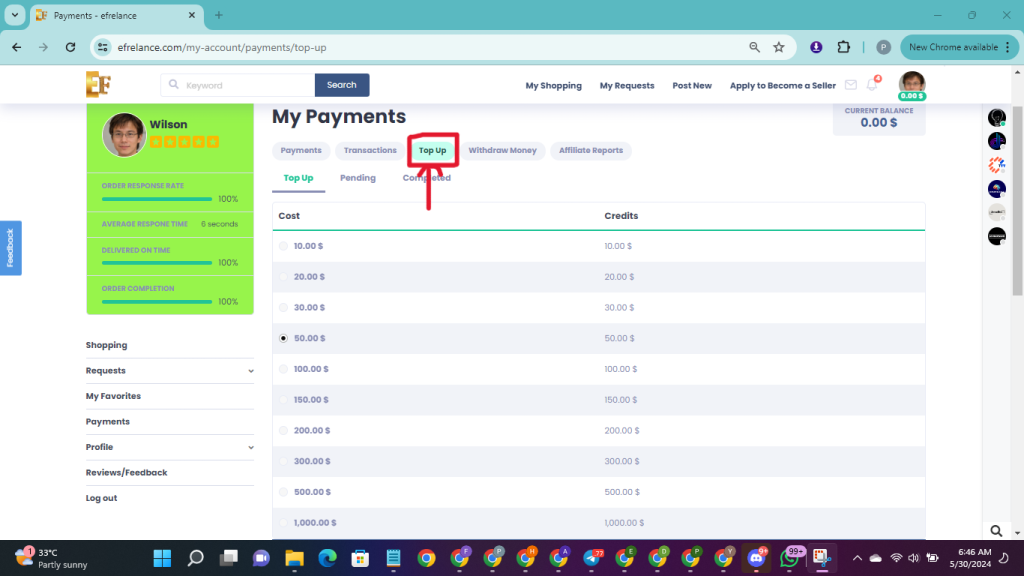
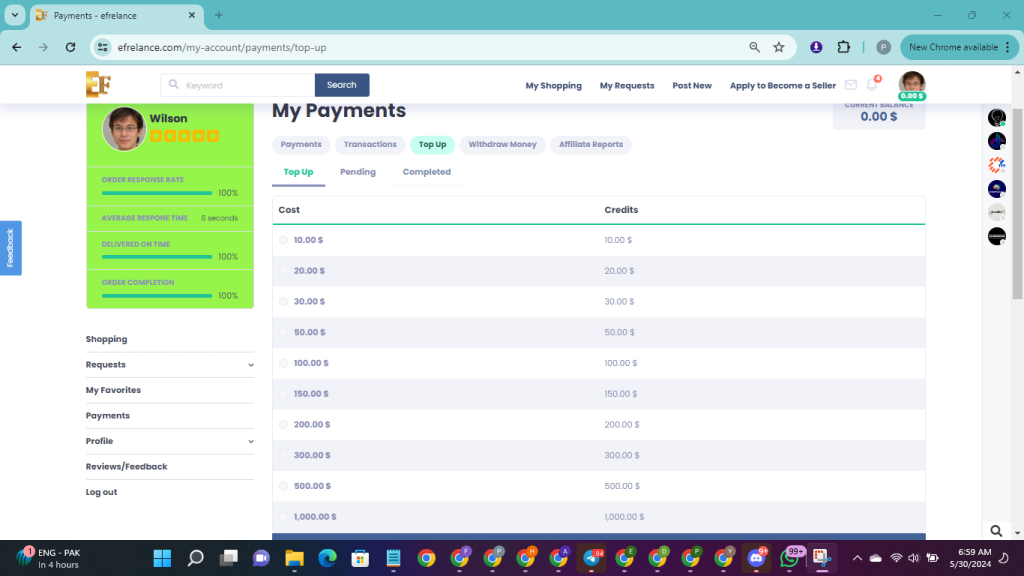
By following these steps, you can easily top up your Efrelance balance and ensure you have enough funds for your purchases. If you encounter any issues during the process, feel free to contact Efrelance customer support for assistance.
We’ve revamped the Seller’s Earnings Page to enhance its navigation, organization, and informational content. Though the interface is now more intuitive, let’s walk through some of the new features you can explore.
If your balance is overdrawn, this section will show the current overdraft total, which will be covered by your future earnings. This occurs if an order is canceled after withdrawal or if you paid for services like Promoted Gigs or the Seller Plus program with future earnings. You can settle your overdraft by clicking the “Pay overdraft balance” button.
You can view your past earnings and expenses and filter them by year, month, or since joining Efrelance.
This table provides detailed information on all your account activities, including order details and descriptions. You can filter activities by date range or type.

Here’s a guide to the most common activity types and icons used to filter the Activity Table:
| Icon | Term | Explanation |
|---|---|---|
 | Clearing | Payments for completed orders still in the clearing period. |
 | Earning | Payments earned from orders, extras, or tips. |
 | Earning Reversed | Canceled earnings. |
 | Compensation | Earnings compensations from Customer Support. |
 | Expense | Earnings spent on services like Promoted Gigs or the Seller Plus program. |
 | Expense Cancellation | Funds returned to your earnings upon purchase cancellation. |
 | Withdrawal | Funds withdrawn from your Efrelance balance to a service provider. |
Above the Activities Table, you can download or email reports and statements:
Here are some tips to navigate the updated stats:
Explore these updates to make the most of your new Earnings Page on Efrelance!
Here’s a guide on how to purchase an order with bank transfer on Efrelance after selecting a gig and completing other necessary steps:
By following these steps, you can successfully purchase an order with bank transfer on Efrelance after selecting a gig and completing other necessary steps.
Note: The default payment method at the time of purchase will be charged, which may not be the original payment method used.
Note: Subscriptions are available only in certain subcategories and to select sellers.
You can work with a seller for up to a 6-month period. Under “Choose your plan,” select the subscription period that suits your needs. For more flexibility, you can ask your seller to create a custom offer on a daily, weekly, or monthly basis.
Sellers can offer discounts on future orders when you subscribe to their Gig. The discount, visible in the “Choose your plan” section, applies from the second order onwards.
With subscriptions, the same order is automatically billed from your saved payment method based on the chosen time period. You can edit your Gig requirements, and sellers can charge extra for additional requirements on the order page.
Note: Each order is independent, and the next one will begin regardless of the previous one’s status unless the subscription is canceled.
You can cancel upcoming subscription orders before the order start date. If an order has already started, regular cancellation terms apply. You can rate your seller’s services after each order’s completion.
Canceling Your Subscription
Subscriptions allow you to offer your services on an ongoing basis, work long-term with your favorite buyers, and attract new ones.
If eligible, you can offer subscriptions with your custom orders and add them to your Gigs.
Cancel Your Subscription
Was this article helpful?
Your live portfolio is a crucial feature that allows potential buyers to see examples of your past work. Buyers love seeing real examples before placing an order, so it’s highly recommended to maintain an active live portfolio for all your jobs on Efrelance. This guide will help you understand how to manage your live portfolio effectively.
The live portfolio feature is enabled by default, allowing buyers to display or remove your work samples once a job is delivered. Here’s how to manage your live portfolio:
An active live portfolio on Efrelance is a powerful tool to attract more buyers and increase your orders. By showcasing your past work, you build trust and credibility with potential buyers. Follow the steps outlined above to manage your live portfolio effectively, and ensure it always reflects the best of your abilities. For further assistance or more tips on managing your portfolio, feel free to reach out to our support team. Happy freelancing!
Maximize your freelance business with our “Selling on Efrelance” support documentation. Discover how to create compelling service listings, set competitive prices, manage client communications, and deliver exceptional work. Our guides offer valuable tips and strategies to help you attract clients, secure projects, and build a successful freelance career on Efrelance. Start here to elevate your selling experience!
The Top Rated badge signifies that a freelancer has been recognized for delivering the highest quality of work and service.
Earning the Top Rated status has always been a sought-after achievement. However, the path to reaching the top tier on Efrelance hasn’t always been transparent. Our revamped level system now provides greater clarity, actionable insights, and a clear view of your progress.
Discover the advantages of Efrelance’s updated level system.
How to Achieve Top Rated Status
Every Top Rated freelancer is carefully reviewed and approved by Efrelance’s evaluation team.
To be considered for this review, you must meet the following criteria:
*Tip: Track your progress on your level overview page.*
Level 2
Success score 9
Rating 4.7
Response rate 80%
Orders 30
Unique clients 15
Earnings $5,000
Next, the evaluation team will review your eligibility for Top Rated status.
We are currently focusing on high-demand categories in need of more Top Rated freelancers.
Once your review is complete, you’ll receive an email with the team’s decision.
If Approved: Your new Top Rated status will be displayed on your dashboard and your level overview page.
If Not Approved: You’ll receive an email with detailed information, including the primary reason for the decision. You will remain at Level 2, but if your metrics continue to meet the criteria after 6 months, you’ll be eligible for another review.
Our team conducts a comprehensive review based on the following four key pillars to determine your eligibility for Top Rated status. Here’s what we consider:
1. Professional Skills
2. Communication and Service
3. Professional Presence
4. Compliance with Efrelance’s Policies
For more details on what makes a Top Rated freelancer, visit our comprehensive guide.
To keep your Top Rated status on Efrelance, it’s essential to maintain the required performance metrics. If any of your metrics fall below the minimum standards, you’ll be given a 30-day grace period to make improvements. Successfully boosting your metrics within this timeframe will allow you to retain your Top Rated status. If improvements are not made, instead of an automatic downgrade, your account will undergo a review by our evaluation team to determine whether you should remain Top Rated.
In cases where the team decides on a downgrade, there is always a way to regain your Top Rated badge. After a 6-month waiting period, if your metrics meet the criteria, your status will be reviewed again, giving you a chance to reclaim your Top Rated status.
Our comprehensive review process ensures that every qualified freelancer receives the recognition they deserve. We are dedicated to carefully assessing each review to ensure the Top Rated badge is awarded to freelancers who demonstrate the highest levels of quality and service.
Currently, the evaluation team is prioritizing high-demand categories that need more Top Rated freelancers. This approach helps freelancers in these categories gain more business opportunities.
Below, you’ll find a list of these high-demand categories, estimated decision timelines, and any additional requirements. This list is regularly updated to reflect changing demands.
For freelancers whose Gigs do not fall into the listed categories, we cannot provide an estimated review timeline. However, if your skills align with one of these categories, consider creating a Gig that showcases those skills to qualify for a prioritized review.
Please Note: Simply adding a Gig to one of the prioritized categories will not automatically qualify you for an expedited review. You must have at least 30 completed orders of approved Gigs in the listed category to be eligible.
Efrelance is a dynamic marketplace where your success is recognized and rewarded through a tiered level system. This system helps you track your progress and sets benchmarks for achieving higher status, which in turn can boost your visibility and credibility among buyers. Here’s a detailed look at the levels and the criteria you need to meet to achieve them.
Achieving Level 1 status is the first milestone on Efrelance. It demonstrates your commitment and reliability as a freelancer. Here are the criteria you need to meet:
Tips to Achieve Level 1:
Reaching Level 2 status signifies that you are a seasoned freelancer on Efrelance. This level provides more visibility and trust among potential clients. To achieve Level 2, you need to meet the following criteria:
Tips to Achieve Level 2:
Becoming a Top Rated Seller is the pinnacle of success on Efrelance. This status is reserved for freelancers who consistently deliver exceptional work and demonstrate outstanding reliability. The criteria for achieving Top Rated status are:
Tips to Achieve Top Rated Status:
1. Do you have any tools that will help me run my freelance business?
2. How can I improve my professionalism and further my freelancing career?
By understanding and leveraging the level system on Efrelance, you can systematically work towards building a successful freelancing career. Each level you achieve not only enhances your credibility but also opens up more opportunities for growth and higher earnings. Start your journey today and reach new heights with Efrelance!
How to Start Selling on Efrelance Marketplace
Welcome to Efrelance, the premier marketplace for digital services. Share your expertise with our vibrant buyer community and earn money doing what you love!
Whether you specialize in graphic design, programming, content writing, translation, or voice-over artistry, Efrelance is your go-to platform. Here are some valuable tips to help you get started:
Crafting Your Seller Profile
Your profile is your introduction to the Efrelance community, so maintaining a professional image is key. Note: If you signed up using the mobile app, please complete your profile setup on a desktop for the best experience.
For more detailed guidance, check out our tutorials on Creating Your Seller Profile and Gig Image Guidelines.
Creating Your Gig
Your Gig represents the service you offer on Efrelance. This is your chance to showcase your skills and provide potential buyers with all the necessary information to choose your services.
Offering Packages
With packages, you can offer three distinct service bundles on your Gig Page. This not only gives buyers more options but also helps you increase your order value!
Upselling – Maximizing Your Gig Earnings
Boost your revenue by upselling through Gig extras. You can offer these extras before, during, and after an order to enhance your earnings.
Sending Custom Offers/Responding to Buyer Requests
Take a proactive approach by sending custom offers tailored to potential buyers’ needs. This way, you can present your personalized services and secure more orders.
Join Efrelance today and start turning your skills into income!
Response Rate and Response Time FAQs for Efrelance Marketplace
We’ve received numerous inquiries from the Efrelance community regarding response times and rates. Here, we’ve compiled answers to the most frequently asked questions.
The Response Rate Indicator serves several important purposes:
The response rate measures the percentage of first responses sent within 24 hours over the last 90 days.
Example: If you received 10 new requests in your inbox over the past 90 days and responded to 9 within 24 hours, your response rate is 90%. Note: If the 10th message is responded to after 24 hours, your response rate remains at 90%, though timely responses are always recommended.
The Response Rate Indicator tracks your first response to a new inbox message from a new buyer. Subsequent replies in the conversation are not tracked, but it’s important to continue the dialogue until it’s concluded.
Improving your response rate is achievable by responding to new messages within 24 hours. Here are some tips:
The response rate updates daily, reflecting the past 90 days.
No, automatic responses do not count as a response to the buyer’s message. They notify the buyer that you are looking into their message, but you must manually respond within 24 hours to avoid affecting your response rate. Your response time is also impacted by how long it takes to manually reply.
Working across different time zones may affect your response time, but not your response rate. You have a full 24 hours to respond to a message, regardless of time zone differences, ensuring your response rate remains unaffected.
Certain messages do not impact your response rate:
Your profile cover photo is an essential part of your presence on Efrelance. It’s one of the first things potential buyers see, and it sets the tone for your professional image. A well-crafted cover photo can help you stand out, attract more clients, and showcase your brand. In this guide, we’ll walk you through the best practices for creating an effective cover photo.
A cover photo enhances your profile by providing a visual representation of your brand and services. It’s an opportunity to make a strong first impression and communicate your professionalism. A great cover photo can:
1. Use the Correct Dimensions
The recommended size for your Efrelance cover photo is 980×180 pixels. Ensuring that your cover photo fits these dimensions will make it look professional and prevent any unwanted cropping or stretching.
2. Keep It Simple and Clean
Your cover photo should be visually appealing but not cluttered. Use a clean design that highlights key elements of your brand. Avoid overcrowding the image with too much text or too many graphics.
3. Reflect Your Services
Use visuals that are relevant to the services you offer. For example, if you are a graphic designer, you might include a snippet of your design work. If you are a writer, you might feature elements like a typewriter or a stack of books.
4. Use High-Quality Images
Ensure that the images you use are high resolution and clear. Blurry or pixelated images can make your profile look unprofessional.
5. Consistent Branding
Incorporate your brand’s colors, fonts, and logo if you have one. Consistent branding across your profile helps build recognition and trust with potential clients.
6. Include a Tagline or Key Message
If space allows, include a short, compelling tagline that encapsulates what you do. This can provide context to potential buyers at a glance.
7. Follow Efrelance Guidelines
Ensure your cover photo complies with Efrelance’s community standards. Avoid using copyrighted material unless you own the rights, and ensure your image aligns with the platform’s policies.
Once you’ve created your cover photo, follow these steps to upload it to your Efrelance profile:
1. Showcase Your Best Work
If possible, include samples of your best work or elements that represent the high quality of your services.
2. Stay Updated
Periodically update your cover photo to keep your profile fresh and reflective of any new skills, services, or branding changes.
3. Seek Feedback
Ask friends, colleagues, or fellow freelancers for feedback on your cover photo. They might provide insights you hadn’t considered.
4. Use Design Tools
Utilize graphic design tools like Canva, Adobe Spark, or Photoshop to create professional-looking cover photos easily.
Your profile cover photo on Efrelance is a powerful tool for making a lasting impression. By following these best practices and using the recommended dimensions (980×180 pixels), you can create a visually appealing and professional cover photo that enhances your profile and attracts more clients. Invest the time to craft a cover photo that truly represents your brand and showcases your professionalism.
Important: Optimize how customers see you by regularly updating your Efrelance seller profile.
Your freelancer profile is designed to highlight the person behind your professional skills. With bigger customers searching for expert freelance talent, your profile emphasizes the most important thing about your service: you.
Be sure to use our job image guidelines when adding images to your profile.
Setting Up Your Efrelance Seller Profile Note: If you don’t see the changes on your Efrelance profile immediately, don’t worry. The new features are being rolled out gradually and you’ll see them soon.
1. Add Your Profile Picture
This should take you ~3 mins
Personal Info > Profile Picture > Add Image
Establish credibility and show customers who you are with a clear and professional photo of yourself. If your profile represents an agency, you can use your company logo.
For more information, read how to make your profile stand out and always ensure that you align with our Community Standards.
2. Add a One-Liner/Tagline
This should take you ~2 mins
My Profile > Tagline
Under your profile picture, provide a precise “one-liner” about your business, professional skills, and/or experience (70 character limit).
Examples: Expert Web Designer; iOS Software Engineering; Expert in Cinematic Editing; Lead Generation Specialist.
Don’t: Mention your personal email, website, or a link to a platform external to Efrelance.
3. Add Your Education
This should take you ~2 mins
My Profile > Education > Add New
Provide your educational details.
4. Provide Your Certifications
My Profile > Certification > Add New
List your certifications.
5. “About Me”/Description
This should take you ~5 mins
My Profile > Edit Description
Share a little about yourself with your buyers—your passions, experience, skills, and whatever else has significantly shaped your professional experience.
Don’t:
6. Tag Your Most Relevant Skills
This should take you ~3 mins
My Profile > Skills > Add New
Tip: Keeping your skills up to date helps you get the jobs. Make sure to add and update your skills and routinely remove any outdated skills. Highlight your areas of specialty and expertise to help potential buyers find your service when they search the marketplace.
Don’t: Mention skills that don’t match your services.
7. Add Your Top Clients
This should take you ~5 mins
My Profile > Add A Client
Note: Currently, this feature is not available for all users. For users already accessing it, it will take a few days to reflect on your profile.
Tip: Add your most familiar customer one at a time, whose work samples you have permission to share in your portfolio.
Don’t: Mention companies’ names you haven’t worked with or use fake companies.
Build customer confidence by showing them the top brands you’ve worked for in the past. See exactly how to add your Top Clients.
8. Add Your Portfolio
This should take you ~15 mins
My Portfolio > Create Project > Upload Your First Project > Complete Details > Create New Project
Note: Currently, this feature is available for eligible sellers only.
Tip: Display your best work to represent your professional know-how, service proficiency, and unique skill set. Always highlight your best and most recent work.
Don’t: Emphasize dated works or mention your personal email, website, or add a link to a platform external to Efrelance. If your service is non-visual in nature, you can still use the portfolio to showcase your service. Example: SEO/Translation services.
Learn more about Using My Portfolio.
Job Images
This should take you about 3 mins
Use job images that stand out and describe your service the best to attract buyers and generate revenue.
When it comes to being the best on Efrelance, connecting with your customers is pivotal to your success. In this article, you will find tips for connecting with your customers, managing your orders, tracking your performance, and general tips for success, along with FAQs we often receive. Additionally, you can access the free “Be a Successful Seller” course.
Win Customers Over with Rapid Replies
Being responsive to your customers not only creates a positive experience for them but also helps build a strong and positive reputation on Efrelance. Take this a step further by providing detailed and informative updates to your customers throughout the entire process. Remember, by responding promptly, you increase your opportunity to receive future business—use Efrelance’s mobile app to respond to your messages anytime and from anywhere!
Use the Quick Response Feature
Found within your inbox and on the order page, Quick Responses—pre-written response templates—help you reply to buyers faster. You can also create your own unique responses. These are great to use when you are very busy.
To Use Quick Responses Within Your Inbox:
To Use Quick Responses Within the Order Page:
Keep Your Customers Updated During the Entire Process
When your buyer has placed the order’s requirements, provide an update once you have received everything you need to get started. It’s important to let your customers know that you are there for them throughout. Let them know of any progress updates in general. Ensure that you follow up on any questions or concerns raised by buyers to instill confidence in the process.
Create Clarity Through a Structured Work Process
From the very beginning of the order, let your customers know when they can expect to receive drafts, the final delivery, and any feedback.
Deliver Quality Work
The delivery should always fulfill (or even better, exceed!) your customers’ requirements. This means that the quality of your work should always be of a high standard. Follow up quality work with quality service and, after the delivery, ask if they are satisfied with the service they received.
Deliver On Time
To give your customers the best experience possible, be sure to deliver on time. A timely delivery is one of the most important factors for your success as an Efrelance seller. If you find yourself running short on time, be proactive and let your customer know ahead of time, and request a delivery due-date extension using the Resolution Center. Once again, the aim is not just to meet your customers’ expectations but to exceed them in every possible way!
Once you’ve optimized your pricing and promoted your job, manage your orders and deliveries even better.
Use the Following Order Management Features:
Order Limit
If you find that you are receiving too many orders but don’t have enough time to complete them, limit the number of orders you can receive for each job. For more, see Limiting Orders.
Delivery Extension
Delivering your service on time is a critical factor in giving your customers the best experience and you being a successful Efrelance seller. However, in the event that you are unable to finish an order on time, make sure to contact your customer as soon as possible to request more time. Visit the Resolution Center to resolve the matter.
Set Your Availability
The Set Availability feature lets customers know when you are unavailable. Prior to your leave, set the time, add a quick note, and activate the feature. You will automatically become available for orders at the end of your set period.
Manage Your Orders Better: Tips
Optimize
If your job does not receive enough views or orders, consider making some changes that can help you earn more. Experiment with your packages’ pricing, the main image of your job, and the job title. Learn from the data and keep optimizing!
FAQs
How can I improve my professionalism and further my freelancing career?
Learn from Efrelance, the online, on-demand platform using video, especially tailored for freelancers and professionals. All the classes are taught by top experts who are distinguished in their fields. These courses contain practical and comprehensive knowledge, exercises, quizzes, and tests. By taking a course, you can level up your skills and grow professionally. When you successfully pass the course’s final quiz, a badge will be added to your profile showcasing the skills you have just learned.
Do you have any tools that will help me run my freelance business?
Yes. With Efrelance Workspace, you can easily send proposals, invoices, get paid, and manage your time and tasks. And best of all, it’s free to download. For more information, visit Efrelance Workspace.
Do you want to know how to grow your career as an online freelancer while offering outstanding experiences for every customer?
It’s no secret that online freelancing is empowering millions to grow their careers, take control of their schedules, and live better lives. Efrelance is leading the way for so many prolific, talented freelancers.
That’s why this course should be your number one choice when growing your business on Efrelance. Learn how Efrelance works, how to create your jobs the right way using killer descriptions, job images, convert potential customers, successfully manage and deliver projects, and more. You can live the lifestyle of a successful freelancer by turning the super tactics we’ll teach you into your success. This course is based on the experience of top Efrelance sellers, as well as a deep understanding of the marketplace and all of the tools that are available for you on the platform.
Manage your Efrelance account with ease using our comprehensive support documentation. Learn how to set up, secure, and optimize your account, update personal information, configure notification settings, and more. Our guides provide step-by-step instructions to ensure you get the most out of your Efrelance experience, helping you stay organized and efficient. Start here to take full control of your freelance journey!
Let’s review everything you need to know about the different account types, how to create a buyer account, and how to activate your seller account.
Before diving into the steps for creating or activating your account, it’s important to understand that all accounts created on Efrelance are buyer accounts by default.
Buyer vs. Seller Account:
Buyers can purchase services (Jobs) from sellers on the Efrelance platform.
Sellers can offer their services through Jobs to buyers on the Efrelance platform.
The distinction between a buyer account and a seller account only arises when a buyer decides to start offering services as a seller.
Note:
Before you can create and sell Jobs on Efrelance, you need to activate a “seller” account.
Activating your seller account and creating Jobs can only be done on a desktop.
All sellers are reviewed during the sign-up and Job creation process and are subject to approval by Efrelance.
Learn more with our Terms of Service.
Efrelance allows you to create a buyer account, a seller account, or a combined buyer and seller account. Additionally, you can have a separate Efrelance Pro account, which helps you organize all your freelance work in one place with enhanced capabilities, at no extra cost.
Note:
Efrelance Pro accounts are for buying only and cannot be converted to seller accounts.
You may only have one seller account on Efrelance.
Learn more about how to create a Efrelance Pro (buyer only) account with Efrelance Pro: Creating your account.
Go to Efrelance’s homepage and click Register.
Fill in your details. Enter your email address, username and password, then click Continue.
Note: You can choose to add company name or not
Get your profile started:
Choose a username. Note: Once created, your username cannot be changed. However, your display name can be edited. Check out our article on How to change your display name.
Confirm your email: Enter the verification code sent to your email.
Your account has now been created.
Once your buyer account is successfully created and activated, you can activate your seller account.
Before activating your seller account, ensure the email on your Efrelance account is correct. If not, change your email or contact Support for assistance.
Activate Your Seller Account:
Log in to your Efrelance account. Once you login, click on Apply to Become A Seller
2. On the redirected page, click Apply to Become a Seller again to start the onboarding process. And then wait for admin to approve your account
Learn more tips and tricks for creating Gigs with Creating a Gig.
By default, all accounts on Efrelance are created as buyer accounts. To create and sell Jobs, you need to activate a seller account.
All sellers are reviewed during the sign-up and Job creation process and are subject to approval by Efrelance. For more details, refer to our Terms of Service.
Steps to Activate Your Seller Account:
Log in to your Efrelance account.
Click on your profile picture.
Select “Apply to Become a Seller” at the top menu.
Start the Onboarding Process:
On the redirected page, click “Apply to Become a Seller” again.
You’ll be directed back to the homepage where you will wait till admin approves your account.
Learn more about creating jobs on Efrelance platform
| Section 1 | Milestone benefits |
| Section 2 | Using Milestones |
| Section 3 | FAQ |
Milestones let you break complex projects into manageable steps. This keeps you organized and ensures both you and your seller stay aligned.
Transparency
Managed Expectations
Communication
Custom Offers: Milestones
Gigs: Milestones
Note: You have 8 days from the delivery of each milestone to request a revision or accept it. If you don’t, the order will stop and be marked as completed.
After accepting the delivery and completing the order, you have 10 days to start the next milestone.
FAQ
When should I use milestones?
Use milestones for bigger projects to allow for more flexibility in smaller steps. Milestones reduce risk and incentivize sellers to maintain high standards with per-task payments.
What are some examples of milestone projects?
Example 1:
When will I be charged?
You’ll be charged for the first milestone when you place an order. Subsequent payments are made upon your approval of each milestone.
How can I cancel a milestones order?
Cancel a milestone or the entire order through the Resolution Center or Customer Support for valid reasons.
I don’t see milestones as an option on my seller’s Gig page. What do I do?
Contact the seller and ask them to send you a custom offer using milestones.
How do revisions work with milestones?
You have 8 days from the delivery of each milestone to request a revision or accept it. If not, the order will stop and be marked as completed.
What is the maximum number of milestones allowed in an order?
A maximum of 5 milestones per Gig order and 6 milestones per custom offer. For ongoing services, consider using Subscriptions instead.
Can I use milestone and subscriptions at the same time?
No, you can choose either subscription or milestones, but they can’t be combined in the same order.
Need more help?
Contact the Customer Success Team! We’re here to guide your project to success. Reach out at @efrelancehelpcenter.com to get started!
Your job listing allows you to showcase your talents to potential buyers on Efrelance. It’s crucial to provide all relevant information needed before a buyer places an order. Occasionally, you may need to update or edit elements of your job listing to keep it fresh and accurate. This guide will walk you through how to effectively edit your jobs.
Regularly updating and editing your job listings on Efrelance ensures that they remain accurate, appealing, and competitive. By following these steps, you can easily make changes to your job information, media, and extras, keeping your services attractive to potential buyers. For further assistance or more tips on managing your jobs, feel free to reach out to our support team. Happy freelancing!
To create a request and allow freelancers to find you as a buyer on Efrelance.com, follow these steps:
Log in to Your Account:
Visit Efrelance.com and log in to your account using your credentials.
Access the Requests Section:
Once logged in, click on “Post A Request”.
Provide Details:
Fill out the form with as much detail as possible about the service or project you need. Include information such as:
Title of the request: A clear and descriptive title that summarizes your project.
Description: Provide a detailed description of the project requirements, including any specific tasks, deliverables, deadlines, and expectations.
Category and subcategory: Select the relevant category and subcategory that best fits your project.
Budget: Indicate your budget for the project. This can be a fixed price or a price range.
Timeline: Specify the expected start date and deadline for the project.
Additional requirements: Any other specific requirements or preferences you have for the project.
Review and Submit:
Review the information you’ve provided to ensure accuracy and completeness. Once you’re satisfied, submit the request.
Wait for Responses:
After submitting your request, it will be visible to freelancers on the platform who specialize in the relevant category. Freelancers who are interested and qualified to work on your project may submit proposals or bids in response to your request.
Evaluate Proposals:
Once you start receiving proposals from freelancers, take the time to review each one carefully. Evaluate the proposals based on factors such as experience, expertise, portfolio, and proposed budget.
Communicate with Freelancers:
Engage with freelancers who have submitted proposals by asking questions, seeking clarifications, and discussing project details further. This will help you assess their suitability for the job.
Award the Project:
After evaluating the proposals and communicating with freelancers, select the freelancer you believe is the best fit for your project. You can then award the project to them, either directly through the platform or by contacting them outside the platform to finalize the details.
Collaborate and Manage the Project:
Once the project is awarded, work closely with the freelancer to collaborate on the project and ensure it progresses smoothly. Use the platform’s communication tools and project management features to track progress, provide feedback, and manage milestones.
By following these steps, you can create a request on Efrelance.com and allow freelancers to find you as a buyer, enabling you to connect with skilled professionals who can help bring your projects to life.
When buyers place orders, they pay Efrelance. Once the order is completed, the funds are credited to your account. The funds remain under a “pending” status clearing period depending on your seller level. This timeline ensures financial processing and buyer satisfaction. Once the funds are marked “cleared,” they become available for withdrawal.
Note: This does not apply to Logo Maker orders. To learn more about Logo Maker earnings and withdrawals, please refer to our article on Efrelance’s Logo Maker earnings tier model.
Processing Time:
Availability:
Method Change:
You will only see the option to withdraw if you have money available in your balance.
Note: Certain options are only available to some sellers and/or locations.
Currency conversion fees apply and additional charges may be added by your bank or payment provider.
Note: Users in Malaysia cannot withdraw in their local currency due to local regulations.
If you currently receive funds in USD and would like to receive funds in EUR, GBP, AUD, CAD, or ILS, you’ll need to register again instead of connecting your payout method.
The Withdraw Balance button can be accessed on the Earnings page. In the Available Funds section, you will see the amount available for you to withdraw and the Withdraw Balance button.
When I set to use my local currency, my revenues don’t update. Why?
What can I do if my withdrawals are failing?
Note: Withdrawals are final and can’t be undone. We will not be able to refund or change this process once it has begun.
My withdrawal was refunded… where are my funds?
Navigate cancellations and refunds smoothly with our comprehensive support documentation. Learn about our policies, understand when cancellations are appropriate, and find out how refunds are processed. Whether you’re a freelancer or a client, our guides provide clear steps for initiating and handling cancellations and refunds, ensuring transparency and fairness for all parties involved. Get acquainted with our procedures to ensure a positive experience on Efrelance.
Note: The default payment method at the time of purchase will be charged, which may not be the original payment method used.
Note: Subscriptions are available only in certain subcategories and to select sellers.
You can work with a seller for up to a 6-month period. Under “Choose your plan,” select the subscription period that suits your needs. For more flexibility, you can ask your seller to create a custom offer on a daily, weekly, or monthly basis.
Sellers can offer discounts on future orders when you subscribe to their Gig. The discount, visible in the “Choose your plan” section, applies from the second order onwards.
With subscriptions, the same order is automatically billed from your saved payment method based on the chosen time period. You can edit your Gig requirements, and sellers can charge extra for additional requirements on the order page.
Note: Each order is independent, and the next one will begin regardless of the previous one’s status unless the subscription is canceled.
You can cancel upcoming subscription orders before the order start date. If an order has already started, regular cancellation terms apply. You can rate your seller’s services after each order’s completion.
Canceling Your Subscription
Subscriptions allow you to offer your services on an ongoing basis, work long-term with your favorite buyers, and attract new ones.
If eligible, you can offer subscriptions with your custom orders and add them to your Gigs.
Cancel Your Subscription
Was this article helpful?
| Section 1 | Milestone benefits |
| Section 2 | Using Milestones |
| Section 3 | FAQ |
Milestones let you break complex projects into manageable steps. This keeps you organized and ensures both you and your seller stay aligned.
Transparency
Managed Expectations
Communication
Custom Offers: Milestones
Gigs: Milestones
Note: You have 8 days from the delivery of each milestone to request a revision or accept it. If you don’t, the order will stop and be marked as completed.
After accepting the delivery and completing the order, you have 10 days to start the next milestone.
FAQ
When should I use milestones?
Use milestones for bigger projects to allow for more flexibility in smaller steps. Milestones reduce risk and incentivize sellers to maintain high standards with per-task payments.
What are some examples of milestone projects?
Example 1:
When will I be charged?
You’ll be charged for the first milestone when you place an order. Subsequent payments are made upon your approval of each milestone.
How can I cancel a milestones order?
Cancel a milestone or the entire order through the Resolution Center or Customer Support for valid reasons.
I don’t see milestones as an option on my seller’s Gig page. What do I do?
Contact the seller and ask them to send you a custom offer using milestones.
How do revisions work with milestones?
You have 8 days from the delivery of each milestone to request a revision or accept it. If not, the order will stop and be marked as completed.
What is the maximum number of milestones allowed in an order?
A maximum of 5 milestones per Gig order and 6 milestones per custom offer. For ongoing services, consider using Subscriptions instead.
Can I use milestone and subscriptions at the same time?
No, you can choose either subscription or milestones, but they can’t be combined in the same order.
Need more help?
Contact the Customer Success Team! We’re here to guide your project to success. Reach out at @efrelancehelpcenter.com to get started!
Important: Cancellations should always be a last resort. They can negatively impact both the buyer experience and the seller’s time and potential income. Here’s an overview of the different types of cancellations:
Note: If issues persist, contact Customer Support for assistance.
Learn more with Resolution Center for Buyers or Resolution Center for Sellers.
The Resolution Center is a great resource for resolving issues quickly and easily between customers and freelancers without needing to contact Customer Support.
Note: The Resolution Center is unavailable for completed and canceled orders.
Get an Order Update
Ask Your Freelancer to Cancel an Order
Note: Disputes submitted through the Resolution Center are sent to the other party and can be viewed on the Order page. They are not sent to Customer Support, nor are they notified of the dispute.
Open Disputes
You won’t be able to open a new dispute if your dispute is in the process of resolving one of these issues:
Forced Cancellation
Note: Only the seller can send the delivery extension request. Buyers may ask their sellers to do so via the order and inbox messages.
Disclaimer: In certain cases, order cancellations may not affect your order completion rate. Learn more with All about Order Completion.
Note: Customers have up to 48 hours to accept or decline your dispute request.
Remember: You can view and/or withdraw your open disputes, request to extend the delivery date, and add Extras/Custom Offers all on the Order page.
Learn more with Cancellations and Helpful Tips on How to Avoid Cancellations.
If you still need further assistance, please contact Customer Support.
Ratings and reviews are essential for promoting a trustworthy experience within the Efrelance marketplace. We aim to maintain a reliable review system that benefits both buyers and freelancers. This guide provides comprehensive information on reviews and ratings, including how to provide feedback, the visibility of reviews, and important considerations.
The public review section allows buyers to rate completed orders, leave written reviews, share work samples, and, in some cases, provide feedback on canceled orders.
Buyers’ ratings, written reviews, and shared work samples are displayed on both the freelancer’s profile (under reviews) and the Gig page (within the Live Portfolio).
Tip: We encourage honest reviews to help others make informed decisions. Please keep reviews respectful and to the point.
How to Add a Review:
Rating Topics:
New Feature: Share your review and showcase the delivered work simultaneously.
Why can’t I add a review to my order?
My order is still active. Can I add a review?
Can I change my review after editing it?
How can I remove the delivered work from showing with my review?
Important: Cancellations should always be a last resort. They can negatively impact both the buyer experience and the seller’s time and potential income. Here’s an overview of the different types of cancellations:
Note: If issues persist, contact Customer Support for assistance.
Learn more with Resolution Center for Buyers or Resolution Center for Sellers.
Let’s review everything you need to know about the different account types, how to create a buyer account, and how to activate your seller account.
Before diving into the steps for creating or activating your account, it’s important to understand that all accounts created on Efrelance are buyer accounts by default.
Buyer vs. Seller Account:
Buyers can purchase services (Jobs) from sellers on the Efrelance platform.
Sellers can offer their services through Jobs to buyers on the Efrelance platform.
The distinction between a buyer account and a seller account only arises when a buyer decides to start offering services as a seller.
Note:
Before you can create and sell Jobs on Efrelance, you need to activate a “seller” account.
Activating your seller account and creating Jobs can only be done on a desktop.
All sellers are reviewed during the sign-up and Job creation process and are subject to approval by Efrelance.
Learn more with our Terms of Service.
Efrelance allows you to create a buyer account, a seller account, or a combined buyer and seller account. Additionally, you can have a separate Efrelance Pro account, which helps you organize all your freelance work in one place with enhanced capabilities, at no extra cost.
Note:
Efrelance Pro accounts are for buying only and cannot be converted to seller accounts.
You may only have one seller account on Efrelance.
Learn more about how to create a Efrelance Pro (buyer only) account with Efrelance Pro: Creating your account.
Go to Efrelance’s homepage and click Register.
Fill in your details. Enter your email address, username and password, then click Continue.
Note: You can choose to add company name or not
Get your profile started:
Choose a username. Note: Once created, your username cannot be changed. However, your display name can be edited. Check out our article on How to change your display name.
Confirm your email: Enter the verification code sent to your email.
Your account has now been created.
Once your buyer account is successfully created and activated, you can activate your seller account.
Before activating your seller account, ensure the email on your Efrelance account is correct. If not, change your email or contact Support for assistance.
Activate Your Seller Account:
Log in to your Efrelance account. Once you login, click on Apply to Become A Seller
2. On the redirected page, click Apply to Become a Seller again to start the onboarding process. And then wait for admin to approve your account
Learn more tips and tricks for creating Gigs with Creating a Gig.
How does the referral program work on Efrelance?
With Efrelance’s referral program, you and your friends can earn rewards. Here’s how it works: When you refer a friend to Efrelance, they will receive a 5% discount on their first purchase. In addition, you will earn a 5% credit of the amount of their first purchase.
To participate in the referral program:
Log in to your Efrelance account.
Then use this link to access the Referral page “https://efrelance.com/referral-url-generator/”
You will be directed to the referral page where you will need to paste a link of the related service your referral wants to buy
Now Search for the service your referral wants to buy. and copy the link above it
After copying the link, then paste it inside the box in Efreelance URL Generator
Then click on ‘Generate’ and Copy the link and send it to your referral
Please note: You will receive a notification and an email once the reward is granted. It may take up to two days for the reward to be processed and credited to your account. Remember, the 5% discount applies only to the first purchase made.
Ensure that your friends sign up using your referral link. The referral won’t work if your friend already has an Efrelance account or if they sign up without using the link.
Please note: All orders must be legitimate. Any attempt to manipulate or exploit the referral program may result in an account suspension.
Explore the powerful tools and features available to sellers on Efrelance with our dedicated support documentation. Learn how to showcase your skills, attract clients, and manage projects effectively. From creating compelling service listings to utilizing communication tools and invoicing options, our guides empower you to maximize your earning potential and deliver exceptional results. Dive into our resources to unlock the full potential of your freelance business on Efrelance.
In the competitive world of freelancing, establishing trust and credibility is paramount. One powerful way to achieve this is by generating social proof for your work on Efrelance. Social proof refers to the positive influence created when people see others engaging with your services or products. Here’s how you can leverage social proof to increase trust and credibility with clients on Efrelance:
By implementing these strategies to generate social proof for your work on Efrelance, you can establish yourself as a trusted and reputable freelancer, attracting more clients and opportunities for success.
Are you looking to give your job listing the spotlight it deserves? Look no further! Efrelance offers an exclusive “Feature Job” option that puts your project directly in front of thousands of talented freelancers.
Ensure your job stands out from the crowd by appearing prominently on Efrelance’s job listings. With increased visibility, you’ll attract more qualified freelancers to bid on your project.
Catch the eye of seasoned professionals and expert freelancers who actively seek out featured jobs. By highlighting your project, you signal to freelancers that you’re serious about finding the best talent.
With more freelancers viewing and bidding on your job, you’ll expedite the hiring process. Choose from a pool of highly skilled candidates who are eager to take on your project.
A featured job garners more attention, creating healthy competition among freelancers vying for the opportunity to work with you. This competition often leads to better proposals and more competitive pricing.
Showcase your commitment to quality by featuring your job. Freelancers are more likely to trust and engage with projects that have been highlighted, knowing they’re backed by serious clients.
Feature your job today and experience the benefits of increased visibility, access to top talent, and a streamlined hiring process. With Efrelance’s “Feature Job” option, finding the perfect freelancer for your project has never been easier.
| Feature | Free | Starter | Business | Professional |
|---|---|---|---|---|
| Job Packages | Available | Available | Available | Available |
| Tips | Available | Available | Available | Available |
| Number of Extras Allowed | 3 | 5 | 10 | 20 |
| Number of Extra Fast Deliveries Allowed | 3 | 5 | 10 | 20 |
| Number of Additional Revisions Allowed | 3 | 5 | 10 | 20 |
| Number of Multiple Jobs Allowed | 3 | 5 | 10 | 20 |
| Number of Active Jobs Allowed | 30 | 50 | 100 | 200 |
| Number of Multiple Extras Allowed | 3 | 5 | 10 | 20 |
| Number of Multiple Videos Allowed | 3 | 5 | 10 | 20 |
| Minimum Price for Job Allowed | $5.00 | $5.00 | $5.00 | $5.00 |
| Maximum Price for Job Allowed | $1,000.00 | $1,000.00 | $1,000.00 | $1,000.00 |
| Minimum Price for Extra Allowed | $5.00 | $5.00 | $5.00 | $5.00 |
| Maximum Price for Extra Allowed | $1,000.00 | $1,000.00 | $1,000.00 | $1,000.00 |
| Minimum Price for Custom Extra Allowed | $5.00 | $5.00 | $5.00 | $5.00 |
| Maximum Price for Custom Extra Allowed | $1,000.00 | $1,000.00 | $1,000.00 | $1,000.00 |
| Profile Label | Subscription Level 0 | Subscription Level 1 | Subscription Level 2 | Subscription Level 3 |
By default, all accounts on Efrelance are created as buyer accounts. To create and sell Jobs, you need to activate a seller account.
All sellers are reviewed during the sign-up and Job creation process and are subject to approval by Efrelance. For more details, refer to our Terms of Service.
Steps to Activate Your Seller Account:
Log in to your Efrelance account.
Click on your profile picture.
Select “Apply to Become a Seller” at the top menu.
Start the Onboarding Process:
On the redirected page, click “Apply to Become a Seller” again.
You’ll be directed back to the homepage where you will wait till admin approves your account.
Learn more about creating jobs on Efrelance platform
Discover exciting freelance opportunities and streamline your job search with our comprehensive support documentation. Learn how to navigate our platform to find relevant projects, submit compelling proposals, and secure rewarding gigs. Whether you’re a seasoned freelancer or just starting out, our guides offer valuable insights and tips to help you succeed in landing your next job on Efrelance. Start exploring to find your next professional challenge!
Your live portfolio is a crucial feature that allows potential buyers to see examples of your past work. Buyers love seeing real examples before placing an order, so it’s highly recommended to maintain an active live portfolio for all your jobs on Efrelance. This guide will help you understand how to manage your live portfolio effectively.
The live portfolio feature is enabled by default, allowing buyers to display or remove your work samples once a job is delivered. Here’s how to manage your live portfolio:
An active live portfolio on Efrelance is a powerful tool to attract more buyers and increase your orders. By showcasing your past work, you build trust and credibility with potential buyers. Follow the steps outlined above to manage your live portfolio effectively, and ensure it always reflects the best of your abilities. For further assistance or more tips on managing your portfolio, feel free to reach out to our support team. Happy freelancing!
Your job listing allows you to showcase your talents to potential buyers on Efrelance. It’s crucial to provide all relevant information needed before a buyer places an order. Occasionally, you may need to update or edit elements of your job listing to keep it fresh and accurate. This guide will walk you through how to effectively edit your jobs.
Regularly updating and editing your job listings on Efrelance ensures that they remain accurate, appealing, and competitive. By following these steps, you can easily make changes to your job information, media, and extras, keeping your services attractive to potential buyers. For further assistance or more tips on managing your jobs, feel free to reach out to our support team. Happy freelancing!
Efrelance provides a fantastic platform to showcase your freelance services, but to maximize your reach and attract more clients, promoting your jobs on social media is essential. Different social media platforms offer unique ways to connect with potential clients. Here’s how you can effectively promote your jobs on various social media channels.
Why Facebook? Facebook is one of the largest social media platforms, offering vast opportunities to reach a diverse audience.
How to Promote on Facebook:
Why Twitter? Twitter is great for sharing quick updates and engaging in real-time conversations with a wide audience.
How to Promote on Twitter:
Why LinkedIn? LinkedIn is a professional networking platform, ideal for connecting with potential clients and showcasing your professional achievements.
How to Promote on LinkedIn:
Why Instagram? Instagram is perfect for visually showcasing your work and connecting with a younger, creative audience.
How to Promote on Instagram:
Why Pinterest? Pinterest is a visual discovery platform, excellent for showcasing portfolios and attracting clients looking for creative services.
How to Promote on Pinterest:
Why TikTok? TikTok is rapidly growing, offering a platform to share short, engaging videos that can go viral.
How to Promote on TikTok:
Why YouTube? YouTube is the go-to platform for video content, perfect for sharing detailed tutorials and showcasing your expertise.
How to Promote on YouTube:
By effectively utilizing these social media platforms, you can significantly boost the visibility of your jobs on Efrelance. Remember to:
Promoting your jobs on social media can greatly enhance your freelance career on Efrelance, helping you attract more clients and grow your business. Start leveraging these platforms today and watch your freelance success soar!
You can share your profile, which includes your jobs, customer reviews, and details.
To share your profile:
To share your job:
By following these steps, you can easily share your profile and job listings with potential clients.
Your portfolio is a powerful tool to attract and impress potential clients. Set yourself apart by showcasing your best work, professional expertise, service proficiency, and unique skills. When clients see the quality of work you can deliver, it builds a new level of trust, which is crucial for upselling your services.
If your service is non-visual, you can still use the portfolio to showcase your work. For services without creative samples, simply describe your work and list your relevant skills in any category (e.g., Writing & Translation, Admin Support, Web Development).
Add a Project to Your Portfolio
You can upload between 2-20 projects to demonstrate the range of your skillset.
To add a project:
How to Maximize Your Portfolio
Note: Ensure you have personally created every item in your portfolio and that you adhere to the marketplace’s Terms of Service.
Let’s explore how to make the most of your portfolio by including various project types, highlighting your skills, and using high-quality images.
Project Types
Use your portfolio to showcase complex projects you’ve delivered. These projects might be difficult to communicate through the job gallery or description alone.
We recommend that the portfolio projects you display should:
Expertise
Choose projects that accurately reflect your best skills and validate your professional specialty, as advertised in your job listings.
Images
First impressions are crucial in business, and visuals can convey powerful messages. When prospective clients view your portfolio, they make decisions quickly. Visually appealing portfolios are more likely to attract clicks and deeper engagement with your service offerings.
Organize Your Portfolio
Be strategic about the projects you display and their order. This varies by service category, but some common best practices across all categories include:
Quality Over Quantity
Emphasis on Up-to-Date Skills
Permission
Tell Your Project’s Story
Your portfolio allows potential clients to see the work you’ve already done. Clients appreciate seeing examples before placing an order, so maintain an active portfolio for all your services.
Use your portfolio to tell your project’s story by focusing on:
Skill Diversity
Dynamic Storytelling
By following these guidelines, you can create a compelling portfolio that highlights your skills, attracts potential clients, and ultimately helps you succeed in the freelance marketplace.
Expanding your presence on various platforms can help you reach a broader audience and grow your profile on Efrelance.
To scout platforms and increase your profile:
Promote Your Efrelance Profile:
By scouting and utilizing multiple platforms, you can significantly increase your visibility, attract more clients, and grow your profile on Efrelance.
It’s essential for clients to see a sample of your work to gauge your professionalism and better understand the services you offer. Add a video to your job listing and use this opportunity to personally and creatively explain your service. Ensure you use a high-quality and original video that stands out.
Disclaimer: Only use images and content created or fully owned by you. Do not use copyrighted materials, or your job listing may be removed from the marketplace.
Job Video Requirements
Video & Animation Subcategories Requiring a Job Video:
Other Categories: While not mandatory, we recommend uploading a job video with audio. Your video can influence customers and motivate them to purchase your services.
Job Video Guidelines: Dos and Don’ts Follow our guidelines to ensure your job videos are high-quality and compliant with our policies. Recommendation: Mention that your services are offered exclusively on Fiverr.
Dos:
Don’ts:
Add a Job Video and Thumbnail
To add a job video to a new job listing:
Note: To adjust your video’s thumbnail, the video must be approved first.
To edit your job video’s thumbnail:
Job extras provide an excellent opportunity to expand your service offering and increase your income on Efrelance. They allow you to showcase additional services that may not be included in your job packages, providing added value to potential buyers. Here’s how you can maximize your earnings with job extras:
In the world of freelancing, your job image is often the first impression buyers have of your service. Making a great first impression is key to attracting potential buyers and boosting sales. To help you succeed on Efrelance, we’ve created comprehensive job image guidelines. Let’s dive into how you can make the most out of your job images:
Before updating your job images, review our Gig image requirements and recommendations. Ensure your job image is appealing, high-quality, and complies with Efrelance’s Terms of Service and Community Standards. A great first impression is crucial in capturing the attention of potential buyers.
If you include text overlay on your job image, keep it concise and visually easy to read. Less is more; use up to 10 words total, and avoid repeating your title. Clear and concise text overlay enhances the visual appeal of your job image.
While the use of third-party logos is permitted, avoid overcrowding your job images with too many logos. Keep your images clean and simple to maintain visual appeal. Remember to respect image usage rights and adhere to Efrelance’s guidelines.
If you choose to upload a picture of yourself, ensure it’s high-quality, well-lit, and in focus. Your image should align with Efrelance’s Community Standards and contribute to a genuine and visually appealing representation of yourself.
Utilize “before and after” images or mockups to showcase your skills and inspire potential buyers. Your sample gallery allows up to three images to display your best work effectively. Avoid overwhelming collages and focus on highlighting your expertise.
If you use stock images or graphics, ensure you have the rights to use them and that they’re high-quality and relevant to your job. Efrelance recommends clean and visually pleasing images, especially in design categories where original work is required.
When combining text, graphics, and photos, ensure your main object remains the focal point. Avoid overwhelming visuals that may confuse potential buyers. The final graphic should capture your audience’s attention effectively.
Utilize examples provided to spark inspiration for your job images. Reviewing examples can help you understand how to upload compelling job images and ignite your creativity.
Remember, a great job image can lead to more sales and revenue. Your online representation influences buyers’ excitement about your service. Use job images that stand out to attract buyers and generate more revenue.
If you need additional assistance to improve and update your job images, our dedicated support team is here to help.
By following these guidelines, you can effectively showcase your services and make a lasting impression on potential buyers. Happy freelancing!
Implementing standardized job packages is a crucial step in enhancing the catalog on Efrelance and fostering business growth for freelancers. By adhering to standardized packages within specific categories, freelancers can ensure consistency and clarity in their service offerings, leading to a better user experience for buyers. Here’s a comprehensive guide on standardizing your job packages:
By standardizing your job packages, you contribute to a more streamlined and consistent user experience on Efrelance while positioning yourself for business growth and success.
For further assistance or guidance, feel free to reach out to our support team. Happy freelancing!
The Resolution Center is a great resource for resolving issues quickly and easily between customers and freelancers without needing to contact Customer Support.
Note: The Resolution Center is unavailable for completed and canceled orders.
Get an Order Update
Ask Your Freelancer to Cancel an Order
Note: Disputes submitted through the Resolution Center are sent to the other party and can be viewed on the Order page. They are not sent to Customer Support, nor are they notified of the dispute.
Open Disputes
You won’t be able to open a new dispute if your dispute is in the process of resolving one of these issues:
Forced Cancellation
Note: Only the seller can send the delivery extension request. Buyers may ask their sellers to do so via the order and inbox messages.
Disclaimer: In certain cases, order cancellations may not affect your order completion rate. Learn more with All about Order Completion.
Note: Customers have up to 48 hours to accept or decline your dispute request.
Remember: You can view and/or withdraw your open disputes, request to extend the delivery date, and add Extras/Custom Offers all on the Order page.
Learn more with Cancellations and Helpful Tips on How to Avoid Cancellations.
If you still need further assistance, please contact Customer Support.
Master the art of order management on Efrelance with our comprehensive support documentation. Learn how to effectively track, organize, and fulfill your orders to ensure timely delivery and client satisfaction. From managing project milestones to handling revisions and resolving disputes, our guides provide step-by-step instructions and best practices to streamline your workflow and enhance your freelance experience. Dive into our resources to optimize your order management process and elevate your success on Efrelance.
Custom offers are all about being proactive—offer your customized services to potential buyers.
Note: Milestone and subscription custom offers are not available in all categories.
Note: This feature is being introduced and is not yet available to all Efrelance users.
Subscription Benefits:
Subscription Details:
Learn more about Subscriptions.
Milestones Benefits:
Milestone Details:
Learn more about Milestones.
Choose either subscription or milestones; they cannot be combined into the same order. Suggest a payment option based on the buyer’s information:
In all cases:
Learn more about custom offers by reading our blog: Custom Offers Can Help Your Efrelance Business Grow.
Learn more with The Perfect Proposal.
Was this article helpful?
.
Structured Gig requirements stand out as one of the most valuable tools for freelancers. The more detailed, straightforward, and organized these requirements are, the smoother your work process will be, leading to better results.
Setting Expectations:
Avoiding Misunderstandings:
Time Saving:
Creating an Organized Work Process:
Enhancing Customer Experience:
Structured Gig requirements not only streamline your workflow but also contribute to a positive buying experience, ultimately leading to increased customer satisfaction.
Delivering a Gig often brings a sense of accomplishment and satisfaction, knowing that you’ve completed a task and are about to be compensated. However, sometimes the hand-off process doesn’t go as smoothly as anticipated, particularly when a buyer does not accept their delivery.
Regardless of the reason, there are occasions when a buyer’s expectations may not align with the delivered work, leading to requests for significant revisions. In such situations, there are several solutions available, including the Resolution Center, designed to help you resolve issues with the buyer before involving Customer Support.
Here’s a step-by-step guide to navigate this process:
It’s normal for buyers to request revisions, even if you’ve put considerable effort into your delivery. Remember, a revision request doesn’t necessarily reflect negatively on your work’s quality. Stay composed, and focus on maintaining professionalism while communicating clearly with the buyer.
Take time to carefully read and understand the buyer’s feedback and revision requests. If necessary, seek clarification from the buyer to ensure you grasp their expectations accurately.
If the requested revisions fall outside the original Gig scope, politely explain this to the buyer. Break down the effort required for the requested changes and suggest revisions that align with the scope while addressing the buyer’s needs.
If you’re capable of making the requested revisions and understand the buyer’s expectations, proceed with revising the work. Use the “REDELIVER NOW” option to submit the modified work via the order page.
While maintaining high ratings is important, avoid pressuring the buyer regarding ratings, especially when addressing dissatisfaction or confusion. Focus on resolving the issue in a professional manner.
If issues persist and cannot be resolved through direct communication, consider using the Resolution Center as a last resort. Here, you can seek assistance in resolving disputes or issues with the order.
If necessary, canceling an order through the Resolution Center may be considered. However, note that certain cancelations may not impact your seller completion rate. Familiarize yourself with the implications of order cancelations through resources like “All about Order Completion.”
For additional guidance and tips on effective communication and order management, consider exploring resources such as Communication Webinars or helpful tips on avoiding cancellations.
Once your Gig has been approved, you are officially eligible to start receiving orders! You can expect to receive a notification for each new order made by a buyer. Depending on your preferences in your account settings, you will receive a push notification and/or an email every time you receive an order.
Note: You can view recent inbox conversations with the buyer from within the order page.
If you find yourself very busy or are unable to handle a large number of orders received, you have the option to set a limit on the number of orders you can receive. This will allow you to manage orders while continuing to provide your buyers with exceptional service.
To limit the number of orders in your queue:
Notes: By using this feature, you can control the number of orders you can receive. Once the limit you set is reached, your Gig will temporarily be removed from Efrelance’s search, meaning that buyers will not see your gig when they look for the service.
If you choose to disable this feature, your Gig will return to Efrelance search (approximately 15 minutes later).
Using this feature does not affect your ranking or ratings.
This feature does not prevent buyers from placing orders in previous custom offers.
As a seller, you can manage your orders based on different tabs on your Manage orders page.
Learn more about the different types of order statuses with What does my order status mean?.
3. Click on an order within the list to view the order details.
Note: The red clock showing the time when the delivery should be made is a helpful tool for sellers to track the time spent on an order. This is not an indicator of the status of the order.
| Tab | Explanation |
| Priority | All the orders that require additional actions from you (e.g. rejected orders, late orders, etc.). |
| New | All the orders that are new orders you’ve received from buyers. |
| Active | All the orders that you’re currently working on, and are In progress.If an order was placed, but the information required from the buyer wasn’t submitted, then you will see that your order is Awaiting requirements. |
| Late | All the orders that have yet to be delivered. An order is considered to be Late if it has not been delivered for 24 hours after the delivery date. |
| Cancelled | All the orders that have been cancelled. |
| Starred | These are the orders that you’ve chosen to highlight as important. |
Revisions allow buyers the ability to reject a seller’s delivery and provide sellers with more time to include buyer feedback and any changes required—based on the delivered work.
Revisions are an optionalfeature that sellers may choose to offer their buyers.
Note: When sellers offer revisions on their Gig, they should be prepared to support the buyers’ requests.
When a buyer requests revisions on an order, the order’s status is updated to Rejected.
This means that the buyer rejected the delivery, and the seller is now required to update the delivery to include the changes requested.
Note: This doesn’t mean that the seller is refusing to work on the revisions requested.
Learn more with What does my order status mean?
| Tips for buyers | Tips for sellers |
| 1. Communicate the changes you require as clearly as possible. | 1. Communicate clearly about the exact amount of revisions you offer your buyers per Gig. |
| 2. To make sure the order status changes, click on the Yes/No buttons and answer the questions (even if they don’t 100% apply to your request).Note: If the order remains Delivered, then your revision request was not recorded correctly. | 2. When your service offers a revision, always respect the buyer’s request.Note: You must communicate the exact amount of revisions you offer as clearly as possible. |
| 3. Keep in mind that revisions must be requested within 3 days of the delivery or the order will be automatically marked as Completed. | 3. If you choose to set unlimited revisions, it’s your responsibility to revise the Gig until the buyer is satisfied. |
To better understand how to provide revisions check out Revisions done right
| Note: The source file extra is available in specific categories only. |
When you create your Gig, you can offer source files as an extra. If a buyer purchases a source file Gig extra, you need to upload the source files when you deliver your order. If a buyer didn’t select the source file extra, you still have the option to upload source files when you deliver, and it will be offered for sale. We recommend that you upload the source files in every delivery.
When you receive an order, you can offer extra services to the buyer within the active order. For example, if you provide logo designs and a buyer ordered your basic service, you can write the buyer a message and offer extra services, such as a higher resolution file, additional revisions, or custom-made stationery.
Notes:
The buyer will be notified and may choose to accept the offer and pay, decline the offer, or ask for changes. You can also withdraw the offer. You will be notified every time the status of the order has changed.
Custom offers are all about being proactive—offer your customized services to potential buyers.
Note: Milestone and subscription custom offers are not available in all categories.
Note: This feature is being introduced and is not yet available to all Efrelance users.
Subscription Benefits:
Subscription Details:
Learn more about Subscriptions.
Milestones Benefits:
Milestone Details:
Learn more about Milestones.
Choose either subscription or milestones; they cannot be combined into the same order. Suggest a payment option based on the buyer’s information:
In all cases:
Learn more about custom offers by reading our blog: Custom Offers Can Help Your Efrelance Business Grow.
Learn more with The Perfect Proposal.
Was this article helpful?
.
To top up your account credit using bank transfer on Efrelance, follow these steps:
By following these steps, you can easily top up your account credit using bank transfer on Efrelance and continue to use the platform’s services for your projects and transactions.
In the competitive world of freelancing, establishing trust and credibility is paramount. One powerful way to achieve this is by generating social proof for your work on Efrelance. Social proof refers to the positive influence created when people see others engaging with your services or products. Here’s how you can leverage social proof to increase trust and credibility with clients on Efrelance:
By implementing these strategies to generate social proof for your work on Efrelance, you can establish yourself as a trusted and reputable freelancer, attracting more clients and opportunities for success.
Navigate the process of hiring freelancers on Efrelance effortlessly with our user-friendly support documentation. Learn how to find the perfect talent for your project, evaluate proposals, and securely manage payments. From posting job listings to communicating with freelancers and managing project milestones, our guides offer valuable insights and tips to ensure a seamless experience. Get started today to find the right freelancer for your needs and bring your projects to life on Efrelance.
Here’s a guide on how to purchase an order with bank transfer on Efrelance after selecting a gig and completing other necessary steps:
By following these steps, you can successfully purchase an order with bank transfer on Efrelance after selecting a gig and completing other necessary steps.
To create a request and allow freelancers to find you as a buyer on Efrelance.com, follow these steps:
Log in to Your Account:
Visit Efrelance.com and log in to your account using your credentials.
Access the Requests Section:
Once logged in, click on “Post A Request”.
Provide Details:
Fill out the form with as much detail as possible about the service or project you need. Include information such as:
Title of the request: A clear and descriptive title that summarizes your project.
Description: Provide a detailed description of the project requirements, including any specific tasks, deliverables, deadlines, and expectations.
Category and subcategory: Select the relevant category and subcategory that best fits your project.
Budget: Indicate your budget for the project. This can be a fixed price or a price range.
Timeline: Specify the expected start date and deadline for the project.
Additional requirements: Any other specific requirements or preferences you have for the project.
Review and Submit:
Review the information you’ve provided to ensure accuracy and completeness. Once you’re satisfied, submit the request.
Wait for Responses:
After submitting your request, it will be visible to freelancers on the platform who specialize in the relevant category. Freelancers who are interested and qualified to work on your project may submit proposals or bids in response to your request.
Evaluate Proposals:
Once you start receiving proposals from freelancers, take the time to review each one carefully. Evaluate the proposals based on factors such as experience, expertise, portfolio, and proposed budget.
Communicate with Freelancers:
Engage with freelancers who have submitted proposals by asking questions, seeking clarifications, and discussing project details further. This will help you assess their suitability for the job.
Award the Project:
After evaluating the proposals and communicating with freelancers, select the freelancer you believe is the best fit for your project. You can then award the project to them, either directly through the platform or by contacting them outside the platform to finalize the details.
Collaborate and Manage the Project:
Once the project is awarded, work closely with the freelancer to collaborate on the project and ensure it progresses smoothly. Use the platform’s communication tools and project management features to track progress, provide feedback, and manage milestones.
By following these steps, you can create a request on Efrelance.com and allow freelancers to find you as a buyer, enabling you to connect with skilled professionals who can help bring your projects to life.
How does the referral program work on Efrelance?
With Efrelance’s referral program, you and your friends can earn rewards. Here’s how it works: When you refer a friend to Efrelance, they will receive a 5% discount on their first purchase. In addition, you will earn a 5% credit of the amount of their first purchase.
To participate in the referral program:
Log in to your Efrelance account.
Then use this link to access the Referral page “https://efrelance.com/referral-url-generator/”
You will be directed to the referral page where you will need to paste a link of the related service your referral wants to buy
Now Search for the service your referral wants to buy. and copy the link above it
After copying the link, then paste it inside the box in Efreelance URL Generator
Then click on ‘Generate’ and Copy the link and send it to your referral
Please note: You will receive a notification and an email once the reward is granted. It may take up to two days for the reward to be processed and credited to your account. Remember, the 5% discount applies only to the first purchase made.
Ensure that your friends sign up using your referral link. The referral won’t work if your friend already has an Efrelance account or if they sign up without using the link.
Please note: All orders must be legitimate. Any attempt to manipulate or exploit the referral program may result in an account suspension.
To top up your account credit using bank transfer on Efrelance, follow these steps:
By following these steps, you can easily top up your account credit using bank transfer on Efrelance and continue to use the platform’s services for your projects and transactions.
Here’s a guide on how to increase your account credit as a buyer on the Efrelance platform:
By following these steps, you can effectively increase your account credit as a buyer on the Efrelance platform and enhance your purchasing power for various services and projects.
Efrelance offers various payment methods to accommodate users from different regions and devices. The available payment methods depend on your device, country of residence, and regulatory permissions. Below is a list of the payment methods you can use:
Note: Cryptocurrency is not accepted as a payment method.
If you have funds in your Efrelance Balance, they will be automatically applied to your next purchase. For purchases exceeding your balance, additional payment sources (such as credit cards, debit card or bank transfer) can be used to cover the difference. On the checkout page, you will see:
For team accounts, only one payment source can be used if the purchase exceeds the balance.
For further assistance, see Payment issues.
For withdrawing your earnings from Efrelance, we currently only accept bank transfers. All withdrawals are processed in USD currency only. Other withdrawal methods such as PayPal are not supported.
All transactions on Efrelance, whether for purchases or withdrawals, are conducted in USD only.
Structured Gig requirements stand out as one of the most valuable tools for freelancers. The more detailed, straightforward, and organized these requirements are, the smoother your work process will be, leading to better results.
Setting Expectations:
Avoiding Misunderstandings:
Time Saving:
Creating an Organized Work Process:
Enhancing Customer Experience:
Structured Gig requirements not only streamline your workflow but also contribute to a positive buying experience, ultimately leading to increased customer satisfaction.
Here’s a guide on how to increase your account credit as a buyer on the Efrelance platform:
By following these steps, you can effectively increase your account credit as a buyer on the Efrelance platform and enhance your purchasing power for various services and projects.
Ratings and reviews are essential for promoting a trustworthy experience within the Efrelance marketplace. We aim to maintain a reliable review system that benefits both buyers and freelancers. This guide provides comprehensive information on reviews and ratings, including how to provide feedback, the visibility of reviews, and important considerations.
The public review section allows buyers to rate completed orders, leave written reviews, share work samples, and, in some cases, provide feedback on canceled orders.
Buyers’ ratings, written reviews, and shared work samples are displayed on both the freelancer’s profile (under reviews) and the Gig page (within the Live Portfolio).
Tip: We encourage honest reviews to help others make informed decisions. Please keep reviews respectful and to the point.
How to Add a Review:
Rating Topics:
New Feature: Share your review and showcase the delivered work simultaneously.
Why can’t I add a review to my order?
My order is still active. Can I add a review?
Can I change my review after editing it?
How can I remove the delivered work from showing with my review?
Are you looking to give your job listing the spotlight it deserves? Look no further! Efrelance offers an exclusive “Feature Job” option that puts your project directly in front of thousands of talented freelancers.
Ensure your job stands out from the crowd by appearing prominently on Efrelance’s job listings. With increased visibility, you’ll attract more qualified freelancers to bid on your project.
Catch the eye of seasoned professionals and expert freelancers who actively seek out featured jobs. By highlighting your project, you signal to freelancers that you’re serious about finding the best talent.
With more freelancers viewing and bidding on your job, you’ll expedite the hiring process. Choose from a pool of highly skilled candidates who are eager to take on your project.
A featured job garners more attention, creating healthy competition among freelancers vying for the opportunity to work with you. This competition often leads to better proposals and more competitive pricing.
Showcase your commitment to quality by featuring your job. Freelancers are more likely to trust and engage with projects that have been highlighted, knowing they’re backed by serious clients.
Feature your job today and experience the benefits of increased visibility, access to top talent, and a streamlined hiring process. With Efrelance’s “Feature Job” option, finding the perfect freelancer for your project has never been easier.
| Feature | Free | Starter | Business | Professional |
|---|---|---|---|---|
| Job Packages | Available | Available | Available | Available |
| Tips | Available | Available | Available | Available |
| Number of Extras Allowed | 3 | 5 | 10 | 20 |
| Number of Extra Fast Deliveries Allowed | 3 | 5 | 10 | 20 |
| Number of Additional Revisions Allowed | 3 | 5 | 10 | 20 |
| Number of Multiple Jobs Allowed | 3 | 5 | 10 | 20 |
| Number of Active Jobs Allowed | 30 | 50 | 100 | 200 |
| Number of Multiple Extras Allowed | 3 | 5 | 10 | 20 |
| Number of Multiple Videos Allowed | 3 | 5 | 10 | 20 |
| Minimum Price for Job Allowed | $5.00 | $5.00 | $5.00 | $5.00 |
| Maximum Price for Job Allowed | $1,000.00 | $1,000.00 | $1,000.00 | $1,000.00 |
| Minimum Price for Extra Allowed | $5.00 | $5.00 | $5.00 | $5.00 |
| Maximum Price for Extra Allowed | $1,000.00 | $1,000.00 | $1,000.00 | $1,000.00 |
| Minimum Price for Custom Extra Allowed | $5.00 | $5.00 | $5.00 | $5.00 |
| Maximum Price for Custom Extra Allowed | $1,000.00 | $1,000.00 | $1,000.00 | $1,000.00 |
| Profile Label | Subscription Level 0 | Subscription Level 1 | Subscription Level 2 | Subscription Level 3 |
Manage your finances on Efrelance confidently with our comprehensive support documentation on payments and withdrawals. Learn how to securely process payments for services rendered, set up payment methods, and withdraw your earnings seamlessly. Whether you’re a freelancer awaiting payouts or a client making payments, our guides provide clear instructions and insights to ensure smooth transactions. Dive into our resources to optimize your financial management and make the most of your Efrelance experience.
When buyers place orders, they pay Efrelance. Once the order is completed, the funds are credited to your account. The funds remain under a “pending” status clearing period depending on your seller level. This timeline ensures financial processing and buyer satisfaction. Once the funds are marked “cleared,” they become available for withdrawal.
Note: This does not apply to Logo Maker orders. To learn more about Logo Maker earnings and withdrawals, please refer to our article on Efrelance’s Logo Maker earnings tier model.
Processing Time:
Availability:
Method Change:
You will only see the option to withdraw if you have money available in your balance.
Note: Certain options are only available to some sellers and/or locations.
Currency conversion fees apply and additional charges may be added by your bank or payment provider.
Note: Users in Malaysia cannot withdraw in their local currency due to local regulations.
If you currently receive funds in USD and would like to receive funds in EUR, GBP, AUD, CAD, or ILS, you’ll need to register again instead of connecting your payout method.
The Withdraw Balance button can be accessed on the Earnings page. In the Available Funds section, you will see the amount available for you to withdraw and the Withdraw Balance button.
When I set to use my local currency, my revenues don’t update. Why?
What can I do if my withdrawals are failing?
Note: Withdrawals are final and can’t be undone. We will not be able to refund or change this process once it has begun.
My withdrawal was refunded… where are my funds?
Efrelance offers various payment methods to accommodate users from different regions and devices. The available payment methods depend on your device, country of residence, and regulatory permissions. Below is a list of the payment methods you can use:
Note: Cryptocurrency is not accepted as a payment method.
If you have funds in your Efrelance Balance, they will be automatically applied to your next purchase. For purchases exceeding your balance, additional payment sources (such as credit cards, debit card or bank transfer) can be used to cover the difference. On the checkout page, you will see:
For team accounts, only one payment source can be used if the purchase exceeds the balance.
For further assistance, see Payment issues.
For withdrawing your earnings from Efrelance, we currently only accept bank transfers. All withdrawals are processed in USD currency only. Other withdrawal methods such as PayPal are not supported.
All transactions on Efrelance, whether for purchases or withdrawals, are conducted in USD only.
Topping up your Efrelance balance is a straightforward process. Follow these steps to ensure you have sufficient funds for your next purchase.
By following these steps, you can easily top up your Efrelance balance and ensure you have enough funds for your purchases. If you encounter any issues during the process, feel free to contact Efrelance customer support for assistance.
We’ve revamped the Seller’s Earnings Page to enhance its navigation, organization, and informational content. Though the interface is now more intuitive, let’s walk through some of the new features you can explore.
If your balance is overdrawn, this section will show the current overdraft total, which will be covered by your future earnings. This occurs if an order is canceled after withdrawal or if you paid for services like Promoted Gigs or the Seller Plus program with future earnings. You can settle your overdraft by clicking the “Pay overdraft balance” button.
You can view your past earnings and expenses and filter them by year, month, or since joining Efrelance.
This table provides detailed information on all your account activities, including order details and descriptions. You can filter activities by date range or type.
Here’s a guide to the most common activity types and icons used to filter the Activity Table:
| Icon | Term | Explanation |
|---|---|---|
| Clearing | Payments for completed orders still in the clearing period. |
| Earning | Payments earned from orders, extras, or tips. |
| Earning Reversed | Canceled earnings. |
| Compensation | Earnings compensations from Customer Support. |
| Expense | Earnings spent on services like Promoted Gigs or the Seller Plus program. |
| Expense Cancellation | Funds returned to your earnings upon purchase cancellation. |
| Withdrawal | Funds withdrawn from your Efrelance balance to a service provider. |
Above the Activities Table, you can download or email reports and statements:
Here are some tips to navigate the updated stats:
Explore these updates to make the most of your new Earnings Page on Efrelance!
Delivering a Gig often brings a sense of accomplishment and satisfaction, knowing that you’ve completed a task and are about to be compensated. However, sometimes the hand-off process doesn’t go as smoothly as anticipated, particularly when a buyer does not accept their delivery.
Regardless of the reason, there are occasions when a buyer’s expectations may not align with the delivered work, leading to requests for significant revisions. In such situations, there are several solutions available, including the Resolution Center, designed to help you resolve issues with the buyer before involving Customer Support.
Here’s a step-by-step guide to navigate this process:
It’s normal for buyers to request revisions, even if you’ve put considerable effort into your delivery. Remember, a revision request doesn’t necessarily reflect negatively on your work’s quality. Stay composed, and focus on maintaining professionalism while communicating clearly with the buyer.
Take time to carefully read and understand the buyer’s feedback and revision requests. If necessary, seek clarification from the buyer to ensure you grasp their expectations accurately.
If the requested revisions fall outside the original Gig scope, politely explain this to the buyer. Break down the effort required for the requested changes and suggest revisions that align with the scope while addressing the buyer’s needs.
If you’re capable of making the requested revisions and understand the buyer’s expectations, proceed with revising the work. Use the “REDELIVER NOW” option to submit the modified work via the order page.
While maintaining high ratings is important, avoid pressuring the buyer regarding ratings, especially when addressing dissatisfaction or confusion. Focus on resolving the issue in a professional manner.
If issues persist and cannot be resolved through direct communication, consider using the Resolution Center as a last resort. Here, you can seek assistance in resolving disputes or issues with the order.
If necessary, canceling an order through the Resolution Center may be considered. However, note that certain cancelations may not impact your seller completion rate. Familiarize yourself with the implications of order cancelations through resources like “All about Order Completion.”
For additional guidance and tips on effective communication and order management, consider exploring resources such as Communication Webinars or helpful tips on avoiding cancellations.
Efrelance provides a fantastic platform to showcase your freelance services, but to maximize your reach and attract more clients, promoting your jobs on social media is essential. Different social media platforms offer unique ways to connect with potential clients. Here’s how you can effectively promote your jobs on various social media channels.
Why Facebook? Facebook is one of the largest social media platforms, offering vast opportunities to reach a diverse audience.
How to Promote on Facebook:
Why Twitter? Twitter is great for sharing quick updates and engaging in real-time conversations with a wide audience.
How to Promote on Twitter:
Why LinkedIn? LinkedIn is a professional networking platform, ideal for connecting with potential clients and showcasing your professional achievements.
How to Promote on LinkedIn:
Why Instagram? Instagram is perfect for visually showcasing your work and connecting with a younger, creative audience.
How to Promote on Instagram:
Why Pinterest? Pinterest is a visual discovery platform, excellent for showcasing portfolios and attracting clients looking for creative services.
How to Promote on Pinterest:
Why TikTok? TikTok is rapidly growing, offering a platform to share short, engaging videos that can go viral.
How to Promote on TikTok:
Why YouTube? YouTube is the go-to platform for video content, perfect for sharing detailed tutorials and showcasing your expertise.
How to Promote on YouTube:
By effectively utilizing these social media platforms, you can significantly boost the visibility of your jobs on Efrelance. Remember to:
Promoting your jobs on social media can greatly enhance your freelance career on Efrelance, helping you attract more clients and grow your business. Start leveraging these platforms today and watch your freelance success soar!
The Top Rated badge signifies that a freelancer has been recognized for delivering the highest quality of work and service.
Earning the Top Rated status has always been a sought-after achievement. However, the path to reaching the top tier on Efrelance hasn’t always been transparent. Our revamped level system now provides greater clarity, actionable insights, and a clear view of your progress.
Discover the advantages of Efrelance’s updated level system.
How to Achieve Top Rated Status
Every Top Rated freelancer is carefully reviewed and approved by Efrelance’s evaluation team.
To be considered for this review, you must meet the following criteria:
*Tip: Track your progress on your level overview page.*
Level 2
Success score 9
Rating 4.7
Response rate 80%
Orders 30
Unique clients 15
Earnings $5,000
Next, the evaluation team will review your eligibility for Top Rated status.
We are currently focusing on high-demand categories in need of more Top Rated freelancers.
Once your review is complete, you’ll receive an email with the team’s decision.
If Approved: Your new Top Rated status will be displayed on your dashboard and your level overview page.
If Not Approved: You’ll receive an email with detailed information, including the primary reason for the decision. You will remain at Level 2, but if your metrics continue to meet the criteria after 6 months, you’ll be eligible for another review.
Our team conducts a comprehensive review based on the following four key pillars to determine your eligibility for Top Rated status. Here’s what we consider:
1. Professional Skills
2. Communication and Service
3. Professional Presence
4. Compliance with Efrelance’s Policies
For more details on what makes a Top Rated freelancer, visit our comprehensive guide.
To keep your Top Rated status on Efrelance, it’s essential to maintain the required performance metrics. If any of your metrics fall below the minimum standards, you’ll be given a 30-day grace period to make improvements. Successfully boosting your metrics within this timeframe will allow you to retain your Top Rated status. If improvements are not made, instead of an automatic downgrade, your account will undergo a review by our evaluation team to determine whether you should remain Top Rated.
In cases where the team decides on a downgrade, there is always a way to regain your Top Rated badge. After a 6-month waiting period, if your metrics meet the criteria, your status will be reviewed again, giving you a chance to reclaim your Top Rated status.
Our comprehensive review process ensures that every qualified freelancer receives the recognition they deserve. We are dedicated to carefully assessing each review to ensure the Top Rated badge is awarded to freelancers who demonstrate the highest levels of quality and service.
Currently, the evaluation team is prioritizing high-demand categories that need more Top Rated freelancers. This approach helps freelancers in these categories gain more business opportunities.
Below, you’ll find a list of these high-demand categories, estimated decision timelines, and any additional requirements. This list is regularly updated to reflect changing demands.
For freelancers whose Gigs do not fall into the listed categories, we cannot provide an estimated review timeline. However, if your skills align with one of these categories, consider creating a Gig that showcases those skills to qualify for a prioritized review.
Please Note: Simply adding a Gig to one of the prioritized categories will not automatically qualify you for an expedited review. You must have at least 30 completed orders of approved Gigs in the listed category to be eligible.
You can share your profile, which includes your jobs, customer reviews, and details.
To share your profile:
To share your job:
By following these steps, you can easily share your profile and job listings with potential clients.
Topping up your Efrelance balance is a straightforward process. Follow these steps to ensure you have sufficient funds for your next purchase.
By following these steps, you can easily top up your Efrelance balance and ensure you have enough funds for your purchases. If you encounter any issues during the process, feel free to contact Efrelance customer support for assistance.
Once your Gig has been approved, you are officially eligible to start receiving orders! You can expect to receive a notification for each new order made by a buyer. Depending on your preferences in your account settings, you will receive a push notification and/or an email every time you receive an order.
Note: You can view recent inbox conversations with the buyer from within the order page.
Your portfolio is a powerful tool to attract and impress potential clients. Set yourself apart by showcasing your best work, professional expertise, service proficiency, and unique skills. When clients see the quality of work you can deliver, it builds a new level of trust, which is crucial for upselling your services.
If your service is non-visual, you can still use the portfolio to showcase your work. For services without creative samples, simply describe your work and list your relevant skills in any category (e.g., Writing & Translation, Admin Support, Web Development).
Add a Project to Your Portfolio
You can upload between 2-20 projects to demonstrate the range of your skillset.
To add a project:
How to Maximize Your Portfolio
Note: Ensure you have personally created every item in your portfolio and that you adhere to the marketplace’s Terms of Service.
Let’s explore how to make the most of your portfolio by including various project types, highlighting your skills, and using high-quality images.
Project Types
Use your portfolio to showcase complex projects you’ve delivered. These projects might be difficult to communicate through the job gallery or description alone.
We recommend that the portfolio projects you display should:
Expertise
Choose projects that accurately reflect your best skills and validate your professional specialty, as advertised in your job listings.
Images
First impressions are crucial in business, and visuals can convey powerful messages. When prospective clients view your portfolio, they make decisions quickly. Visually appealing portfolios are more likely to attract clicks and deeper engagement with your service offerings.
Organize Your Portfolio
Be strategic about the projects you display and their order. This varies by service category, but some common best practices across all categories include:
Quality Over Quantity
Emphasis on Up-to-Date Skills
Permission
Tell Your Project’s Story
Your portfolio allows potential clients to see the work you’ve already done. Clients appreciate seeing examples before placing an order, so maintain an active portfolio for all your services.
Use your portfolio to tell your project’s story by focusing on:
Skill Diversity
Dynamic Storytelling
By following these guidelines, you can create a compelling portfolio that highlights your skills, attracts potential clients, and ultimately helps you succeed in the freelance marketplace.
Efrelance is a dynamic marketplace where your success is recognized and rewarded through a tiered level system. This system helps you track your progress and sets benchmarks for achieving higher status, which in turn can boost your visibility and credibility among buyers. Here’s a detailed look at the levels and the criteria you need to meet to achieve them.
Achieving Level 1 status is the first milestone on Efrelance. It demonstrates your commitment and reliability as a freelancer. Here are the criteria you need to meet:
Tips to Achieve Level 1:
Reaching Level 2 status signifies that you are a seasoned freelancer on Efrelance. This level provides more visibility and trust among potential clients. To achieve Level 2, you need to meet the following criteria:
Tips to Achieve Level 2:
Becoming a Top Rated Seller is the pinnacle of success on Efrelance. This status is reserved for freelancers who consistently deliver exceptional work and demonstrate outstanding reliability. The criteria for achieving Top Rated status are:
Tips to Achieve Top Rated Status:
1. Do you have any tools that will help me run my freelance business?
2. How can I improve my professionalism and further my freelancing career?
By understanding and leveraging the level system on Efrelance, you can systematically work towards building a successful freelancing career. Each level you achieve not only enhances your credibility but also opens up more opportunities for growth and higher earnings. Start your journey today and reach new heights with Efrelance!
Expanding your presence on various platforms can help you reach a broader audience and grow your profile on Efrelance.
To scout platforms and increase your profile:
Promote Your Efrelance Profile:
By scouting and utilizing multiple platforms, you can significantly increase your visibility, attract more clients, and grow your profile on Efrelance.
If you find yourself very busy or are unable to handle a large number of orders received, you have the option to set a limit on the number of orders you can receive. This will allow you to manage orders while continuing to provide your buyers with exceptional service.
To limit the number of orders in your queue:
Notes: By using this feature, you can control the number of orders you can receive. Once the limit you set is reached, your Gig will temporarily be removed from Efrelance’s search, meaning that buyers will not see your gig when they look for the service.
If you choose to disable this feature, your Gig will return to Efrelance search (approximately 15 minutes later).
Using this feature does not affect your ranking or ratings.
This feature does not prevent buyers from placing orders in previous custom offers.
As a seller, you can manage your orders based on different tabs on your Manage orders page.
Learn more about the different types of order statuses with What does my order status mean?.
3. Click on an order within the list to view the order details.
Note: The red clock showing the time when the delivery should be made is a helpful tool for sellers to track the time spent on an order. This is not an indicator of the status of the order.
| Tab | Explanation |
| Priority | All the orders that require additional actions from you (e.g. rejected orders, late orders, etc.). |
| New | All the orders that are new orders you’ve received from buyers. |
| Active | All the orders that you’re currently working on, and are In progress.If an order was placed, but the information required from the buyer wasn’t submitted, then you will see that your order is Awaiting requirements. |
| Late | All the orders that have yet to be delivered. An order is considered to be Late if it has not been delivered for 24 hours after the delivery date. |
| Cancelled | All the orders that have been cancelled. |
| Starred | These are the orders that you’ve chosen to highlight as important. |
We’ve revamped the Seller’s Earnings Page to enhance its navigation, organization, and informational content. Though the interface is now more intuitive, let’s walk through some of the new features you can explore.
If your balance is overdrawn, this section will show the current overdraft total, which will be covered by your future earnings. This occurs if an order is canceled after withdrawal or if you paid for services like Promoted Gigs or the Seller Plus program with future earnings. You can settle your overdraft by clicking the “Pay overdraft balance” button.
You can view your past earnings and expenses and filter them by year, month, or since joining Efrelance.
This table provides detailed information on all your account activities, including order details and descriptions. You can filter activities by date range or type.
Here’s a guide to the most common activity types and icons used to filter the Activity Table:
| Icon | Term | Explanation |
|---|---|---|
| Clearing | Payments for completed orders still in the clearing period. |
| Earning | Payments earned from orders, extras, or tips. |
| Earning Reversed | Canceled earnings. |
| Compensation | Earnings compensations from Customer Support. |
| Expense | Earnings spent on services like Promoted Gigs or the Seller Plus program. |
| Expense Cancellation | Funds returned to your earnings upon purchase cancellation. |
| Withdrawal | Funds withdrawn from your Efrelance balance to a service provider. |
Above the Activities Table, you can download or email reports and statements:
Here are some tips to navigate the updated stats:
Explore these updates to make the most of your new Earnings Page on Efrelance!
It’s essential for clients to see a sample of your work to gauge your professionalism and better understand the services you offer. Add a video to your job listing and use this opportunity to personally and creatively explain your service. Ensure you use a high-quality and original video that stands out.
Disclaimer: Only use images and content created or fully owned by you. Do not use copyrighted materials, or your job listing may be removed from the marketplace.
Job Video Requirements
Video & Animation Subcategories Requiring a Job Video:
Other Categories: While not mandatory, we recommend uploading a job video with audio. Your video can influence customers and motivate them to purchase your services.
Job Video Guidelines: Dos and Don’ts Follow our guidelines to ensure your job videos are high-quality and compliant with our policies. Recommendation: Mention that your services are offered exclusively on Fiverr.
Dos:
Don’ts:
Add a Job Video and Thumbnail
To add a job video to a new job listing:
Note: To adjust your video’s thumbnail, the video must be approved first.
To edit your job video’s thumbnail:
How to Start Selling on Efrelance Marketplace
Welcome to Efrelance, the premier marketplace for digital services. Share your expertise with our vibrant buyer community and earn money doing what you love!
Whether you specialize in graphic design, programming, content writing, translation, or voice-over artistry, Efrelance is your go-to platform. Here are some valuable tips to help you get started:
Crafting Your Seller Profile
Your profile is your introduction to the Efrelance community, so maintaining a professional image is key. Note: If you signed up using the mobile app, please complete your profile setup on a desktop for the best experience.
For more detailed guidance, check out our tutorials on Creating Your Seller Profile and Gig Image Guidelines.
Creating Your Gig
Your Gig represents the service you offer on Efrelance. This is your chance to showcase your skills and provide potential buyers with all the necessary information to choose your services.
Offering Packages
With packages, you can offer three distinct service bundles on your Gig Page. This not only gives buyers more options but also helps you increase your order value!
Upselling – Maximizing Your Gig Earnings
Boost your revenue by upselling through Gig extras. You can offer these extras before, during, and after an order to enhance your earnings.
Sending Custom Offers/Responding to Buyer Requests
Take a proactive approach by sending custom offers tailored to potential buyers’ needs. This way, you can present your personalized services and secure more orders.
Join Efrelance today and start turning your skills into income!
Revisions allow buyers the ability to reject a seller’s delivery and provide sellers with more time to include buyer feedback and any changes required—based on the delivered work.
Revisions are an optionalfeature that sellers may choose to offer their buyers.
Note: When sellers offer revisions on their Gig, they should be prepared to support the buyers’ requests.
When a buyer requests revisions on an order, the order’s status is updated to Rejected.
This means that the buyer rejected the delivery, and the seller is now required to update the delivery to include the changes requested.
Note: This doesn’t mean that the seller is refusing to work on the revisions requested.
Learn more with What does my order status mean?
| Tips for buyers | Tips for sellers |
| 1. Communicate the changes you require as clearly as possible. | 1. Communicate clearly about the exact amount of revisions you offer your buyers per Gig. |
| 2. To make sure the order status changes, click on the Yes/No buttons and answer the questions (even if they don’t 100% apply to your request).Note: If the order remains Delivered, then your revision request was not recorded correctly. | 2. When your service offers a revision, always respect the buyer’s request.Note: You must communicate the exact amount of revisions you offer as clearly as possible. |
| 3. Keep in mind that revisions must be requested within 3 days of the delivery or the order will be automatically marked as Completed. | 3. If you choose to set unlimited revisions, it’s your responsibility to revise the Gig until the buyer is satisfied. |
To better understand how to provide revisions check out Revisions done right
Welcome to Efrelance, the premier marketplace for digital services. Share your expertise with our vibrant buyer community and earn money doing what you love!
Whether you specialize in graphic design, programming, content writing, translation, or voice-over artistry, Efrelance is your go-to platform. Here are some valuable tips to help you get started:
Crafting Your Seller Profile
Your profile is your introduction to the Efrelance community, so maintaining a professional image is key. Note: If you signed up using the mobile app, please complete your profile setup on a desktop for the best experience.
For more detailed guidance, check out our tutorials on Creating Your Seller Profile and Gig Image Guidelines.
Creating Your Gig
Your Gig represents the service you offer on Efrelance. This is your chance to showcase your skills and provide potential buyers with all the necessary information to choose your services.
Offering Packages
With packages, you can offer three distinct service bundles on your Gig Page. This not only gives buyers more options but also helps you increase your order value!
Upselling – Maximizing Your Gig Earnings
Boost your revenue by upselling through Gig extras. You can offer these extras before, during, and after an order to enhance your earnings.
Sending Custom Offers/Responding to Buyer Requests
Take a proactive approach by sending custom offers tailored to potential buyers’ needs. This way, you can present your personalized services and secure more orders.
Join Efrelance today and start turning your skills into income!
Job extras provide an excellent opportunity to expand your service offering and increase your income on Efrelance. They allow you to showcase additional services that may not be included in your job packages, providing added value to potential buyers. Here’s how you can maximize your earnings with job extras:
| Note: The source file extra is available in specific categories only. |
When you create your Gig, you can offer source files as an extra. If a buyer purchases a source file Gig extra, you need to upload the source files when you deliver your order. If a buyer didn’t select the source file extra, you still have the option to upload source files when you deliver, and it will be offered for sale. We recommend that you upload the source files in every delivery.
Response Rate and Response Time FAQs for Efrelance Marketplace
We’ve received numerous inquiries from the Efrelance community regarding response times and rates. Here, we’ve compiled answers to the most frequently asked questions.
The Response Rate Indicator serves several important purposes:
The response rate measures the percentage of first responses sent within 24 hours over the last 90 days.
Example: If you received 10 new requests in your inbox over the past 90 days and responded to 9 within 24 hours, your response rate is 90%. Note: If the 10th message is responded to after 24 hours, your response rate remains at 90%, though timely responses are always recommended.
The Response Rate Indicator tracks your first response to a new inbox message from a new buyer. Subsequent replies in the conversation are not tracked, but it’s important to continue the dialogue until it’s concluded.
Improving your response rate is achievable by responding to new messages within 24 hours. Here are some tips:
The response rate updates daily, reflecting the past 90 days.
No, automatic responses do not count as a response to the buyer’s message. They notify the buyer that you are looking into their message, but you must manually respond within 24 hours to avoid affecting your response rate. Your response time is also impacted by how long it takes to manually reply.
Working across different time zones may affect your response time, but not your response rate. You have a full 24 hours to respond to a message, regardless of time zone differences, ensuring your response rate remains unaffected.
Certain messages do not impact your response rate:
In the world of freelancing, your job image is often the first impression buyers have of your service. Making a great first impression is key to attracting potential buyers and boosting sales. To help you succeed on Efrelance, we’ve created comprehensive job image guidelines. Let’s dive into how you can make the most out of your job images:
Before updating your job images, review our Gig image requirements and recommendations. Ensure your job image is appealing, high-quality, and complies with Efrelance’s Terms of Service and Community Standards. A great first impression is crucial in capturing the attention of potential buyers.
If you include text overlay on your job image, keep it concise and visually easy to read. Less is more; use up to 10 words total, and avoid repeating your title. Clear and concise text overlay enhances the visual appeal of your job image.
While the use of third-party logos is permitted, avoid overcrowding your job images with too many logos. Keep your images clean and simple to maintain visual appeal. Remember to respect image usage rights and adhere to Efrelance’s guidelines.
If you choose to upload a picture of yourself, ensure it’s high-quality, well-lit, and in focus. Your image should align with Efrelance’s Community Standards and contribute to a genuine and visually appealing representation of yourself.
Utilize “before and after” images or mockups to showcase your skills and inspire potential buyers. Your sample gallery allows up to three images to display your best work effectively. Avoid overwhelming collages and focus on highlighting your expertise.
If you use stock images or graphics, ensure you have the rights to use them and that they’re high-quality and relevant to your job. Efrelance recommends clean and visually pleasing images, especially in design categories where original work is required.
When combining text, graphics, and photos, ensure your main object remains the focal point. Avoid overwhelming visuals that may confuse potential buyers. The final graphic should capture your audience’s attention effectively.
Utilize examples provided to spark inspiration for your job images. Reviewing examples can help you understand how to upload compelling job images and ignite your creativity.
Remember, a great job image can lead to more sales and revenue. Your online representation influences buyers’ excitement about your service. Use job images that stand out to attract buyers and generate more revenue.
If you need additional assistance to improve and update your job images, our dedicated support team is here to help.
By following these guidelines, you can effectively showcase your services and make a lasting impression on potential buyers. Happy freelancing!
When you receive an order, you can offer extra services to the buyer within the active order. For example, if you provide logo designs and a buyer ordered your basic service, you can write the buyer a message and offer extra services, such as a higher resolution file, additional revisions, or custom-made stationery.
Notes:
The buyer will be notified and may choose to accept the offer and pay, decline the offer, or ask for changes. You can also withdraw the offer. You will be notified every time the status of the order has changed.
Implementing standardized job packages is a crucial step in enhancing the catalog on Efrelance and fostering business growth for freelancers. By adhering to standardized packages within specific categories, freelancers can ensure consistency and clarity in their service offerings, leading to a better user experience for buyers. Here’s a comprehensive guide on standardizing your job packages:
By standardizing your job packages, you contribute to a more streamlined and consistent user experience on Efrelance while positioning yourself for business growth and success.
For further assistance or guidance, feel free to reach out to our support team. Happy freelancing!
Your profile cover photo is an essential part of your presence on Efrelance. It’s one of the first things potential buyers see, and it sets the tone for your professional image. A well-crafted cover photo can help you stand out, attract more clients, and showcase your brand. In this guide, we’ll walk you through the best practices for creating an effective cover photo.
A cover photo enhances your profile by providing a visual representation of your brand and services. It’s an opportunity to make a strong first impression and communicate your professionalism. A great cover photo can:
1. Use the Correct Dimensions
The recommended size for your Efrelance cover photo is 980×180 pixels. Ensuring that your cover photo fits these dimensions will make it look professional and prevent any unwanted cropping or stretching.
2. Keep It Simple and Clean
Your cover photo should be visually appealing but not cluttered. Use a clean design that highlights key elements of your brand. Avoid overcrowding the image with too much text or too many graphics.
3. Reflect Your Services
Use visuals that are relevant to the services you offer. For example, if you are a graphic designer, you might include a snippet of your design work. If you are a writer, you might feature elements like a typewriter or a stack of books.
4. Use High-Quality Images
Ensure that the images you use are high resolution and clear. Blurry or pixelated images can make your profile look unprofessional.
5. Consistent Branding
Incorporate your brand’s colors, fonts, and logo if you have one. Consistent branding across your profile helps build recognition and trust with potential clients.
6. Include a Tagline or Key Message
If space allows, include a short, compelling tagline that encapsulates what you do. This can provide context to potential buyers at a glance.
7. Follow Efrelance Guidelines
Ensure your cover photo complies with Efrelance’s community standards. Avoid using copyrighted material unless you own the rights, and ensure your image aligns with the platform’s policies.
Once you’ve created your cover photo, follow these steps to upload it to your Efrelance profile:
1. Showcase Your Best Work
If possible, include samples of your best work or elements that represent the high quality of your services.
2. Stay Updated
Periodically update your cover photo to keep your profile fresh and reflective of any new skills, services, or branding changes.
3. Seek Feedback
Ask friends, colleagues, or fellow freelancers for feedback on your cover photo. They might provide insights you hadn’t considered.
4. Use Design Tools
Utilize graphic design tools like Canva, Adobe Spark, or Photoshop to create professional-looking cover photos easily.
Your profile cover photo on Efrelance is a powerful tool for making a lasting impression. By following these best practices and using the recommended dimensions (980×180 pixels), you can create a visually appealing and professional cover photo that enhances your profile and attracts more clients. Invest the time to craft a cover photo that truly represents your brand and showcases your professionalism.
Important: Optimize how customers see you by regularly updating your Efrelance seller profile.
Your freelancer profile is designed to highlight the person behind your professional skills. With bigger customers searching for expert freelance talent, your profile emphasizes the most important thing about your service: you.
Be sure to use our job image guidelines when adding images to your profile.
Setting Up Your Efrelance Seller Profile Note: If you don’t see the changes on your Efrelance profile immediately, don’t worry. The new features are being rolled out gradually and you’ll see them soon.
1. Add Your Profile Picture
This should take you ~3 mins
Personal Info > Profile Picture > Add Image
Establish credibility and show customers who you are with a clear and professional photo of yourself. If your profile represents an agency, you can use your company logo.
For more information, read how to make your profile stand out and always ensure that you align with our Community Standards.
2. Add a One-Liner/Tagline
This should take you ~2 mins
My Profile > Tagline
Under your profile picture, provide a precise “one-liner” about your business, professional skills, and/or experience (70 character limit).
Examples: Expert Web Designer; iOS Software Engineering; Expert in Cinematic Editing; Lead Generation Specialist.
Don’t: Mention your personal email, website, or a link to a platform external to Efrelance.
3. Add Your Education
This should take you ~2 mins
My Profile > Education > Add New
Provide your educational details.
4. Provide Your Certifications
My Profile > Certification > Add New
List your certifications.
5. “About Me”/Description
This should take you ~5 mins
My Profile > Edit Description
Share a little about yourself with your buyers—your passions, experience, skills, and whatever else has significantly shaped your professional experience.
Don’t:
6. Tag Your Most Relevant Skills
This should take you ~3 mins
My Profile > Skills > Add New
Tip: Keeping your skills up to date helps you get the jobs. Make sure to add and update your skills and routinely remove any outdated skills. Highlight your areas of specialty and expertise to help potential buyers find your service when they search the marketplace.
Don’t: Mention skills that don’t match your services.
7. Add Your Top Clients
This should take you ~5 mins
My Profile > Add A Client
Note: Currently, this feature is not available for all users. For users already accessing it, it will take a few days to reflect on your profile.
Tip: Add your most familiar customer one at a time, whose work samples you have permission to share in your portfolio.
Don’t: Mention companies’ names you haven’t worked with or use fake companies.
Build customer confidence by showing them the top brands you’ve worked for in the past. See exactly how to add your Top Clients.
8. Add Your Portfolio
This should take you ~15 mins
My Portfolio > Create Project > Upload Your First Project > Complete Details > Create New Project
Note: Currently, this feature is available for eligible sellers only.
Tip: Display your best work to represent your professional know-how, service proficiency, and unique skill set. Always highlight your best and most recent work.
Don’t: Emphasize dated works or mention your personal email, website, or add a link to a platform external to Efrelance. If your service is non-visual in nature, you can still use the portfolio to showcase your service. Example: SEO/Translation services.
Learn more about Using My Portfolio.
Job Images
This should take you about 3 mins
Use job images that stand out and describe your service the best to attract buyers and generate revenue.
When it comes to being the best on Efrelance, connecting with your customers is pivotal to your success. In this article, you will find tips for connecting with your customers, managing your orders, tracking your performance, and general tips for success, along with FAQs we often receive. Additionally, you can access the free “Be a Successful Seller” course.
Win Customers Over with Rapid Replies
Being responsive to your customers not only creates a positive experience for them but also helps build a strong and positive reputation on Efrelance. Take this a step further by providing detailed and informative updates to your customers throughout the entire process. Remember, by responding promptly, you increase your opportunity to receive future business—use Efrelance’s mobile app to respond to your messages anytime and from anywhere!
Use the Quick Response Feature
Found within your inbox and on the order page, Quick Responses—pre-written response templates—help you reply to buyers faster. You can also create your own unique responses. These are great to use when you are very busy.
To Use Quick Responses Within Your Inbox:
To Use Quick Responses Within the Order Page:
Keep Your Customers Updated During the Entire Process
When your buyer has placed the order’s requirements, provide an update once you have received everything you need to get started. It’s important to let your customers know that you are there for them throughout. Let them know of any progress updates in general. Ensure that you follow up on any questions or concerns raised by buyers to instill confidence in the process.
Create Clarity Through a Structured Work Process
From the very beginning of the order, let your customers know when they can expect to receive drafts, the final delivery, and any feedback.
Deliver Quality Work
The delivery should always fulfill (or even better, exceed!) your customers’ requirements. This means that the quality of your work should always be of a high standard. Follow up quality work with quality service and, after the delivery, ask if they are satisfied with the service they received.
Deliver On Time
To give your customers the best experience possible, be sure to deliver on time. A timely delivery is one of the most important factors for your success as an Efrelance seller. If you find yourself running short on time, be proactive and let your customer know ahead of time, and request a delivery due-date extension using the Resolution Center. Once again, the aim is not just to meet your customers’ expectations but to exceed them in every possible way!
Once you’ve optimized your pricing and promoted your job, manage your orders and deliveries even better.
Use the Following Order Management Features:
Order Limit
If you find that you are receiving too many orders but don’t have enough time to complete them, limit the number of orders you can receive for each job. For more, see Limiting Orders.
Delivery Extension
Delivering your service on time is a critical factor in giving your customers the best experience and you being a successful Efrelance seller. However, in the event that you are unable to finish an order on time, make sure to contact your customer as soon as possible to request more time. Visit the Resolution Center to resolve the matter.
Set Your Availability
The Set Availability feature lets customers know when you are unavailable. Prior to your leave, set the time, add a quick note, and activate the feature. You will automatically become available for orders at the end of your set period.
Manage Your Orders Better: Tips
Optimize
If your job does not receive enough views or orders, consider making some changes that can help you earn more. Experiment with your packages’ pricing, the main image of your job, and the job title. Learn from the data and keep optimizing!
FAQs
How can I improve my professionalism and further my freelancing career?
Learn from Efrelance, the online, on-demand platform using video, especially tailored for freelancers and professionals. All the classes are taught by top experts who are distinguished in their fields. These courses contain practical and comprehensive knowledge, exercises, quizzes, and tests. By taking a course, you can level up your skills and grow professionally. When you successfully pass the course’s final quiz, a badge will be added to your profile showcasing the skills you have just learned.
Do you have any tools that will help me run my freelance business?
Yes. With Efrelance Workspace, you can easily send proposals, invoices, get paid, and manage your time and tasks. And best of all, it’s free to download. For more information, visit Efrelance Workspace.
Do you want to know how to grow your career as an online freelancer while offering outstanding experiences for every customer?
It’s no secret that online freelancing is empowering millions to grow their careers, take control of their schedules, and live better lives. Efrelance is leading the way for so many prolific, talented freelancers.
That’s why this course should be your number one choice when growing your business on Efrelance. Learn how Efrelance works, how to create your jobs the right way using killer descriptions, job images, convert potential customers, successfully manage and deliver projects, and more. You can live the lifestyle of a successful freelancer by turning the super tactics we’ll teach you into your success. This course is based on the experience of top Efrelance sellers, as well as a deep understanding of the marketplace and all of the tools that are available for you on the platform.