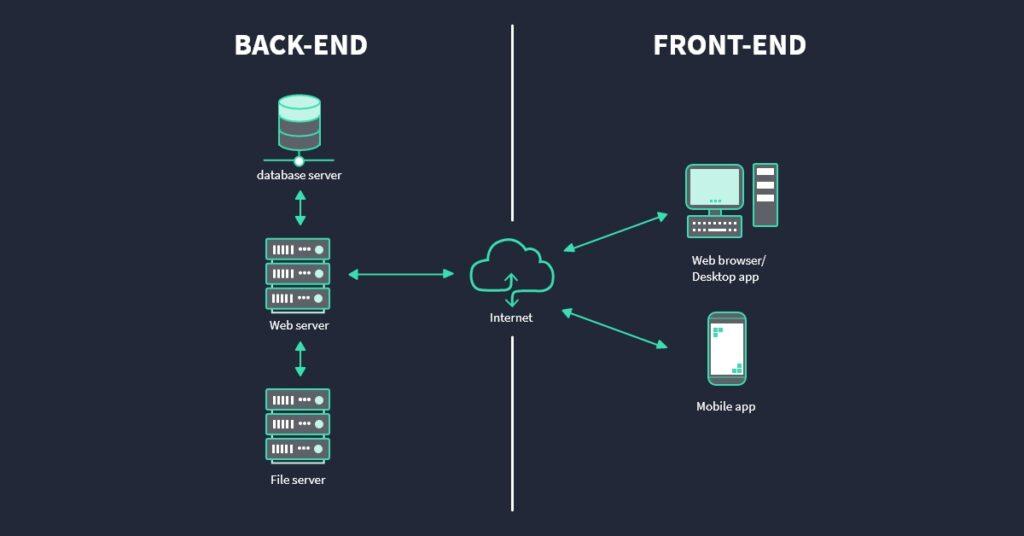
How to Build a Back-End Application Using ASP.NET Core
In the ever-evolving world of web development, building an efficient back-end application is crucial. ASP.NET Core, a powerful and versatile web framework developed by Microsoft, simplifies the process of creating robust back-end applications. In this guide, we will explore how to effectively build a back-end application using ASP.NET Core, covering key concepts, benefits, and practical steps.
What is ASP.NET Core?
ASP.NET Core is an open-source framework for building web applications. It unifies the traditional ASP.NET framework with cloud-based capabilities, allowing developers to create fast, scalable, and high-performance applications. Key features include:
- Cross-Platform: Works on Windows, macOS, and Linux.
- Modular Architecture: Lets developers include only the libraries they need.
- Dependency Injection: Enhances the testability and maintainability of applications.
- High Performance: Designed for the modern web, leveraging asynchronous programming models.
Benefits of Using ASP.NET Core for Back-End Development
Choosing ASP.NET Core for your back-end application comes with numerous advantages:
- Performance: ASP.NET Core delivers excellent performance metrics as shown in various benchmarks.
- Scalability: The framework is designed to easily develop scalable applications.
- Community Support: A vast community ensures continuous improvement and support.
- Simplicity: Clean and modern architecture makes it easier for developers to build and manage applications.
Steps to Build a Back-End Application Using ASP.NET Core
Now, let’s go through the essential steps for building a back-end application using ASP.NET Core.
Step 1: Setup Your Development Environment
Begin by installing the necessary tools:
- Install .NET SDK: Download the latest .NET SDK from the official .NET website.
- Choose an IDE: Use Visual Studio, Visual Studio Code, or JetBrains Rider depending on your preference.
Step 2: Create a New ASP.NET Core Project
Once your environment is set up, create a new project by following these steps:
- Open your IDE and select “Create a new project”.
- Choose “ASP.NET Core Web Application”.
- Select a template (API for building RESTful services is recommended).
- Name your project and choose a location to save it.
Step 3: Understand the Project Structure
The default templates come with a structured setup, including:
- Controllers: Where the API logic is implemented.
- Models: Data models representing the data structure.
- Data: Database context and related configurations.
Step 4: Define Your Data Models
Create classes that represent your data structure. For example:
public class Product {

    public int Id { get; set; }

    public string Name { get; set; }

    public decimal Price { get; set; }

}
Step 5: Set Up Entity Framework Core
Entity Framework Core (EF Core) simplifies data access. To set it up:
- Add the EF Core packages to your project using NuGet Package Manager:
- Create your Data Context class, inheriting from
DbContext.
Install-Package Microsoft.EntityFrameworkCore.SqlServer
Step 6: Set Up Database Connections
Configure your database connection string in appsettings.json:
"ConnectionStrings": {

    "DefaultConnection": "Server=(localdb)\mssqllocaldb;Database=MyDb;Trusted_Connection=True;"

}
Step 7: Create Your API Endpoints
Within the Controllers folder, create a new controller for managing products:
[Route("api/[controller]")]

[ApiController]

public class ProductsController : ControllerBase {

    private readonly DataContext _context;


    public ProductsController(DataContext context) {

        _context = context;

    }


    // GET: api/products

    [HttpGet]

    public async Task>> GetProducts() {

        return await _context.Products.ToListAsync();

    }

}
Step 8: Run Your Application
Start your application using the command dotnet run in your terminal or build and start it in your IDE. You can test your API endpoints using tools like Postman or cURL.
Practical Tips for Successful Development
- Adhere to REST Principles: Ensure your API is RESTful with proper HTTP methods and status codes.
- Use DTOs: Utilize Data Transfer Objects to enhance performance and security.
- Implement Error Handling: Proper error management is essential for a resilient application.
Case Study: Real-World Usage of ASP.NET Core
A great example of ASP.NET Core in action is Stack Overflow. The website leverages ASP.NET Core for its performance and scalability, allowing millions of users to access its services seamlessly. Its architecture enables rapid development and deployment, showing how ASP.NET Core can be harnessed effectively in large-scale applications.
First-Hand Experience: Building My Own Application
During my recent project to develop a task management application with ASP.NET Core, I found the framework intuitive and robust. The built-in dependency injection and seamless integration with EF Core significantly accelerated my development process. Furthermore, the comprehensive documentation provided by Microsoft helped resolve any challenges I faced along the way.
Conclusion
Building a back-end application using ASP.NET Core can be a rewarding experience for developers. The framework’s versatility, efficiency, and strong community support make it an ideal choice for modern web development. By following the steps outlined in this article, along with leveraging practical tips and real-world examples, you’ll be well on your way to creating high-quality back-end applications. Dive in, explore the possibilities, and create something amazing with ASP.NET Core!


